Triton Powered Respirator
by
Bill Esposito
26 March 2004
updated 3 Apr 2004
New Update 9 Jan 2005

The more I get into woodworking the more safety conscience I become.
While surfing the woodworking message boards it's hard to miss the constant
chatter about safety devices. As a novice woodturner who's first
hour on a lathe was interrupted by a flying spindle between the eyes (I
was wearing a face shield), I was very interested to see how Triton Woodworking
Systems as addressed a number of our safety concerns, dust, eye, ear and
head protection, with their new powered respirator. Thanks to Triton
Woodworking Systems for providing the respirator for review.
As with all my reviews main intent is to try to provide the reader with
all the information they need to make an informed purchase. There will
be plenty of photo's, some very close up, which I hope will give you a
feel for the tool and which should preclude you from being surprised when
you open the box. Click on any picture to enlarge it.
If you are only interested in the lasted update where the hose is replaced,
click here.
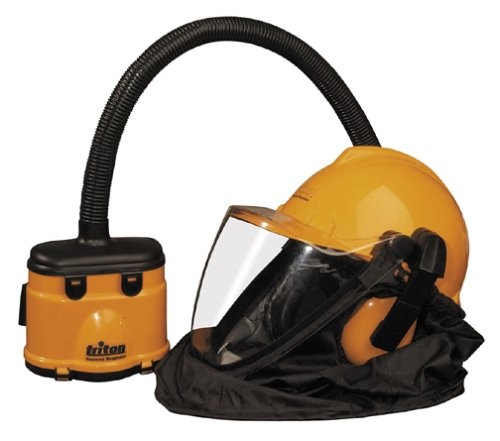
What's in the box?
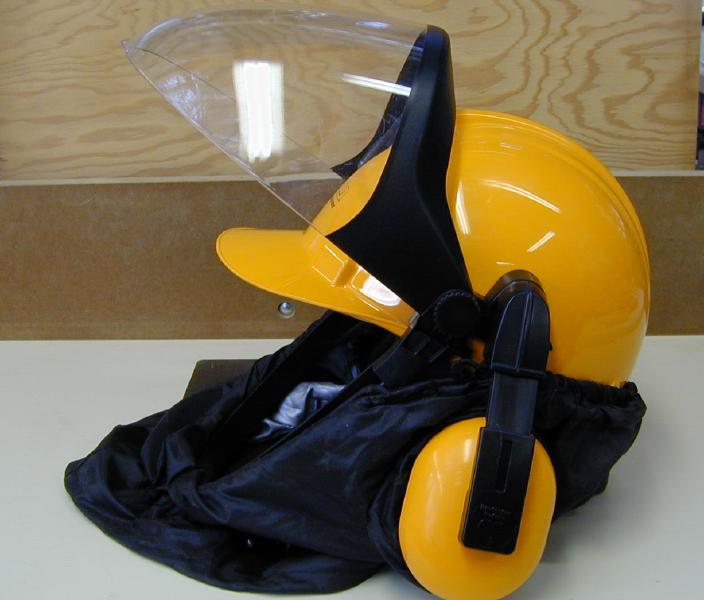
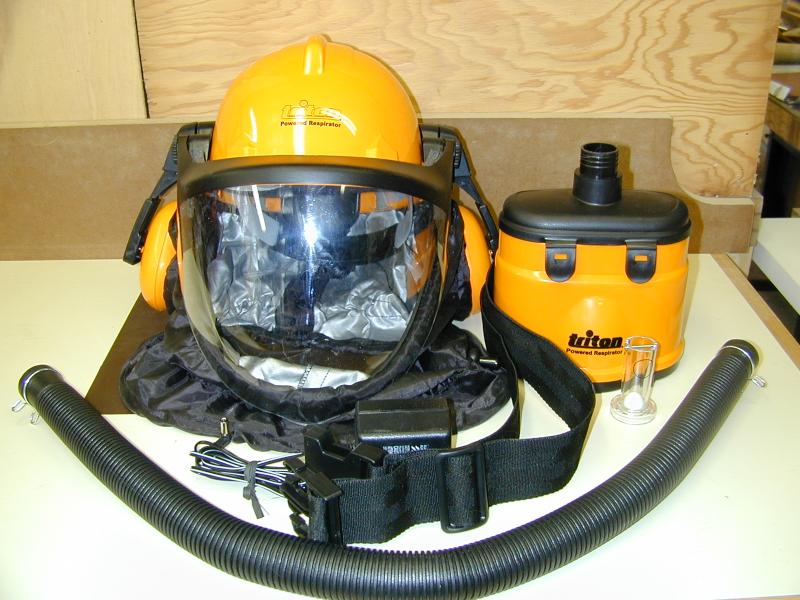 As you can see the Triton Powered
Respirator comes in the familiar Triton orange just as the rest of their
products. The head piece includes an AS/NZS 1801 approved hard hat
with integrated AS/NZS 1270 approved ear protectors and an AS/NZS 1337
approved face shield. The head piece also includes an integrated
shroud to keep the dust out and the ducting for the filtered air.
The waist belt mounted filter unit contains two AS/NZS 1716 approved dust
filters and NiCad batteries.. The other accessories are the instruction
manual, air hose, air flow meter, and DC power transformer used for charging
the batteries. All of this comes securely packaged in a foot and
a half square box. As you can see the Triton Powered
Respirator comes in the familiar Triton orange just as the rest of their
products. The head piece includes an AS/NZS 1801 approved hard hat
with integrated AS/NZS 1270 approved ear protectors and an AS/NZS 1337
approved face shield. The head piece also includes an integrated
shroud to keep the dust out and the ducting for the filtered air.
The waist belt mounted filter unit contains two AS/NZS 1716 approved dust
filters and NiCad batteries.. The other accessories are the instruction
manual, air hose, air flow meter, and DC power transformer used for charging
the batteries. All of this comes securely packaged in a foot and
a half square box.
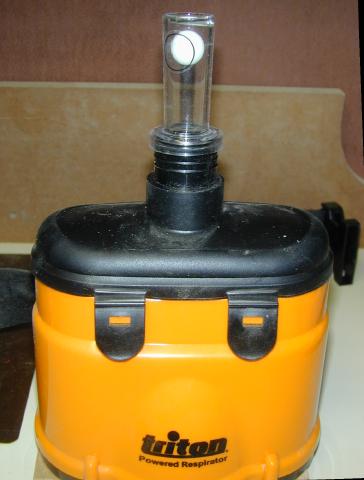
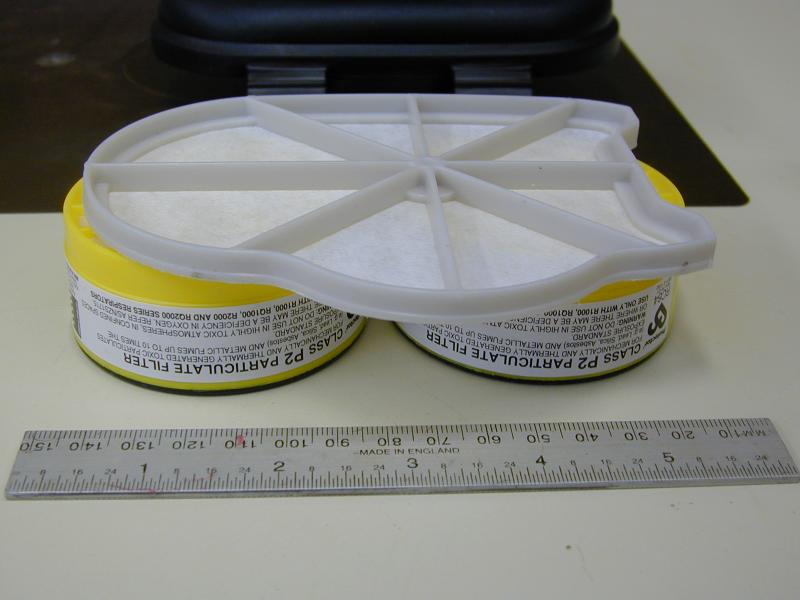
A look into the filter
 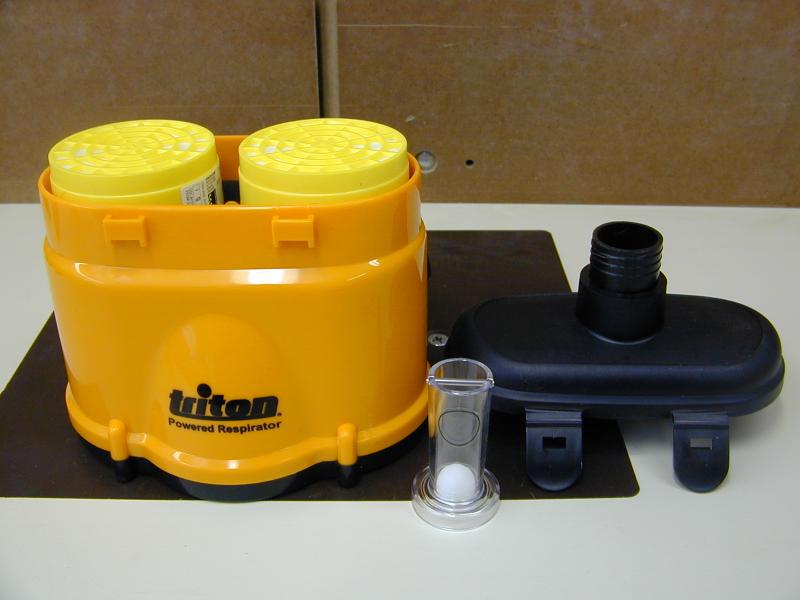 The
filter unit actually contains 3 filters. Two internal filters which
are rated to the Australian standard as P2 (Equivalent to the American
N95 class) particulate filters which allow 1% of the particles below 1
micron to pass and will remove 95% particulates down to 0.3 micron.
Triton also sells an additional filter called CIGWELD. This filter
is used during welding operations. There is also a pre filter (photo
at right) which snaps onto the bottom of the assembly and should catch
all the big stuff and keep it out of the motor assembly. In that
same photo also notice the dust booted power switch and the LED indicating
that the unit is being charged. The
filter unit actually contains 3 filters. Two internal filters which
are rated to the Australian standard as P2 (Equivalent to the American
N95 class) particulate filters which allow 1% of the particles below 1
micron to pass and will remove 95% particulates down to 0.3 micron.
Triton also sells an additional filter called CIGWELD. This filter
is used during welding operations. There is also a pre filter (photo
at right) which snaps onto the bottom of the assembly and should catch
all the big stuff and keep it out of the motor assembly. In that
same photo also notice the dust booted power switch and the LED indicating
that the unit is being charged.
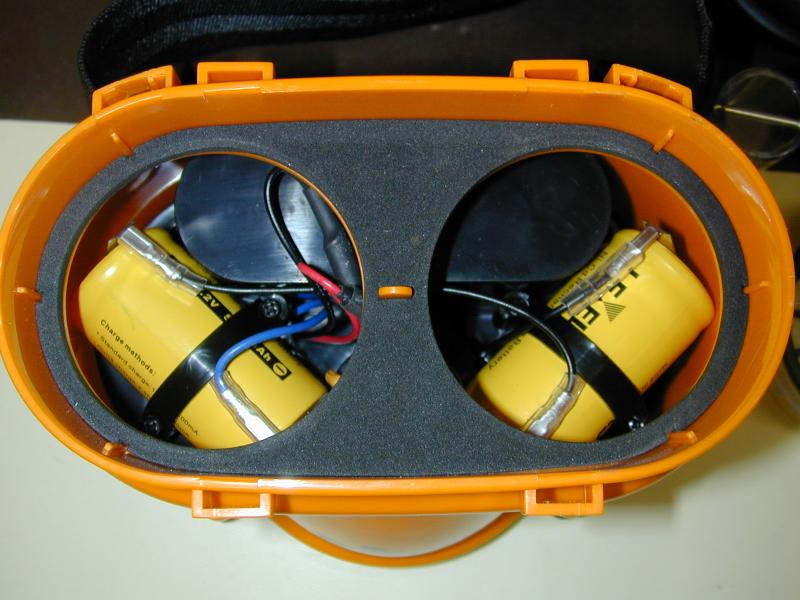  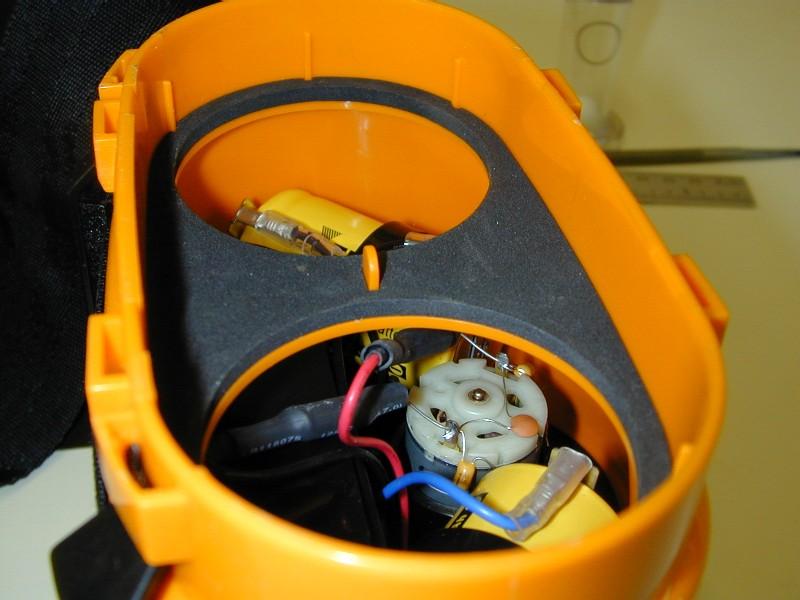
In the three pictures above you can see the assembly with all the filters
removed. The photo at left is looking straight down into the assembly.
The two yellow things are D sized NiCad batteries which are soldered in
place (five in all). The middle picture is with the pre-filter removed
and looking at the bottom of the assembly. You can see the impeller
just above the nameplate and the power switch on the left. The photo
at right is again looking through the top but this time at an angle to
expose the impeller motor. The air movement through a clean filter
assembly is 120 liters/min.
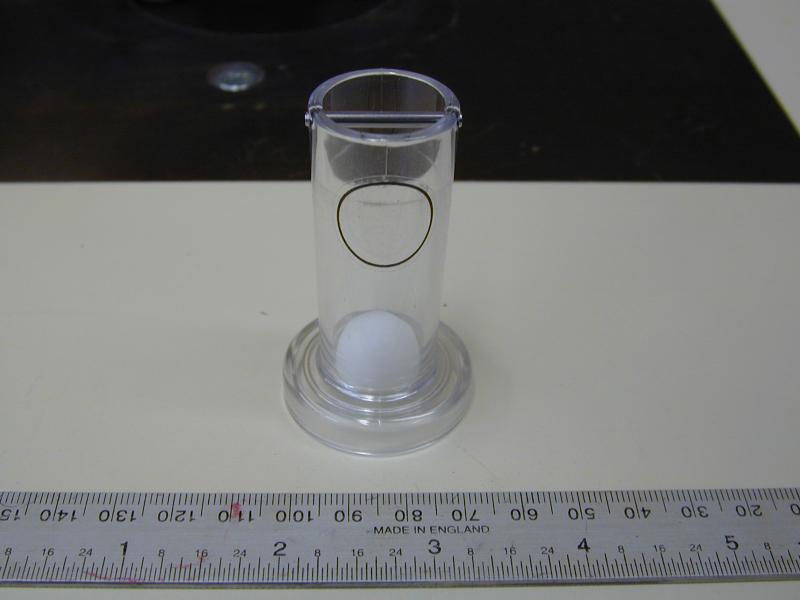 The last thing I want to show you before we move
on to the headgear is the flow meter. This is simply a clear plastic
tube with a captive ball and a target. (This brings back some memories
of tuning the carburetors on my MG) The way it works is that you
attach the meter to the output of the filter and if the ball is in the
target circle then all is well. If it's below the target then either
the batteries are in need of a charge or the filters need changing.
We'll spend a little more time on this later in the review. The last thing I want to show you before we move
on to the headgear is the flow meter. This is simply a clear plastic
tube with a captive ball and a target. (This brings back some memories
of tuning the carburetors on my MG) The way it works is that you
attach the meter to the output of the filter and if the ball is in the
target circle then all is well. If it's below the target then either
the batteries are in need of a charge or the filters need changing.
We'll spend a little more time on this later in the review.
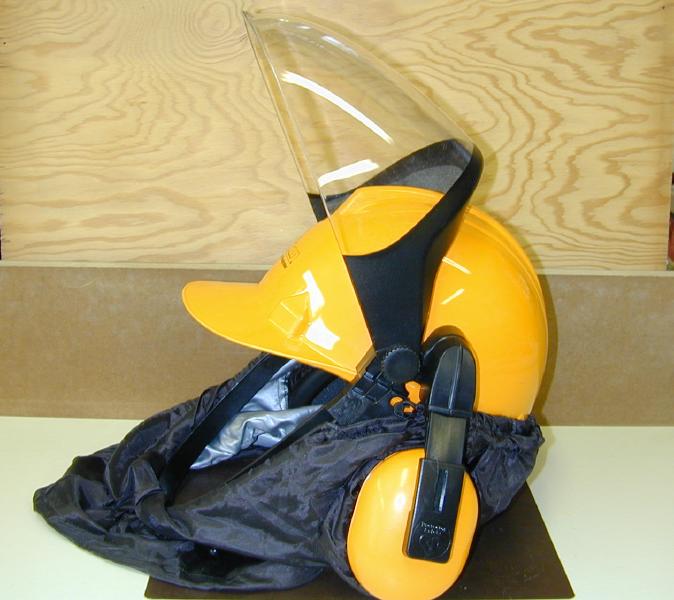
The Headgear
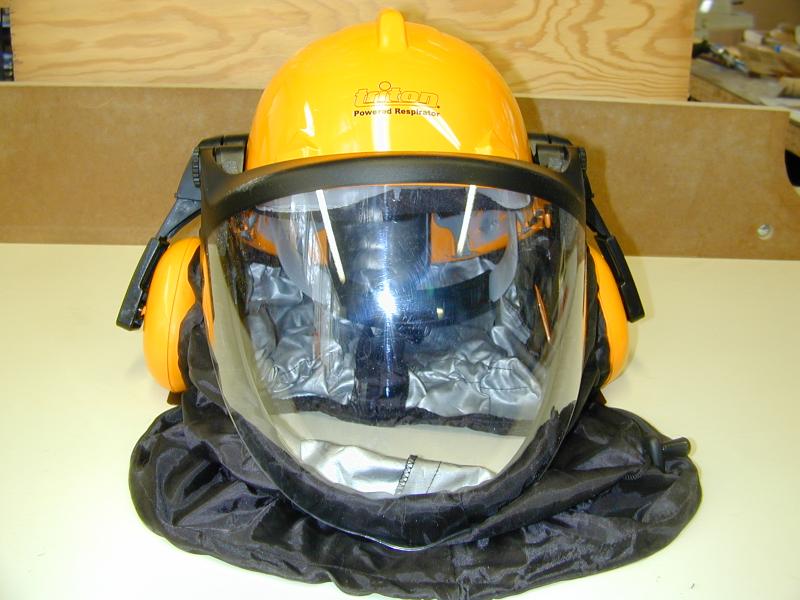  The entire
headgear is very well put together and is of high quality with the same
excellent fit and finish I've come to expect from Triton products.
The facemask arrived, and still is scratch free and a replacement can be
purchased for $20. The ear protectors are rated for 23dBA to the
Australian standard. The ear protectors swing out of the way (as
pictured) but are not recommended for removal because they will leave a
hole in the shroud. They adjust up and down so that you can get a
comfortable fit. I could not adjust them up enough so that they were
not sitting on my ear lobes and I could not see a way to modify either
the muffs or the headgear harness to allow for a comfortable fit. The entire
headgear is very well put together and is of high quality with the same
excellent fit and finish I've come to expect from Triton products.
The facemask arrived, and still is scratch free and a replacement can be
purchased for $20. The ear protectors are rated for 23dBA to the
Australian standard. The ear protectors swing out of the way (as
pictured) but are not recommended for removal because they will leave a
hole in the shroud. They adjust up and down so that you can get a
comfortable fit. I could not adjust them up enough so that they were
not sitting on my ear lobes and I could not see a way to modify either
the muffs or the headgear harness to allow for a comfortable fit.
 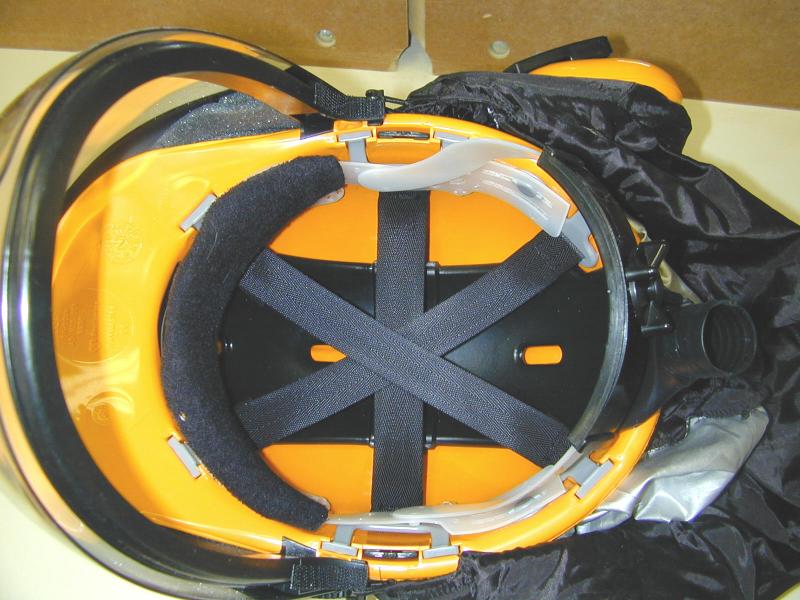 The webbing in the hat was
similar to every hard hat I've seen. There is a ratcheting adjustment in
the rear which adjusts for head size. Depending on how big your head
is, the knob can interfere with the air inlet on the back of the hat (photo
right is after the adjustment below). Luckily there is an undocumented
adjustment which can gain your some head room (pun intended) The webbing in the hat was
similar to every hard hat I've seen. There is a ratcheting adjustment in
the rear which adjusts for head size. Depending on how big your head
is, the knob can interfere with the air inlet on the back of the hat (photo
right is after the adjustment below). Luckily there is an undocumented
adjustment which can gain your some head room (pun intended)
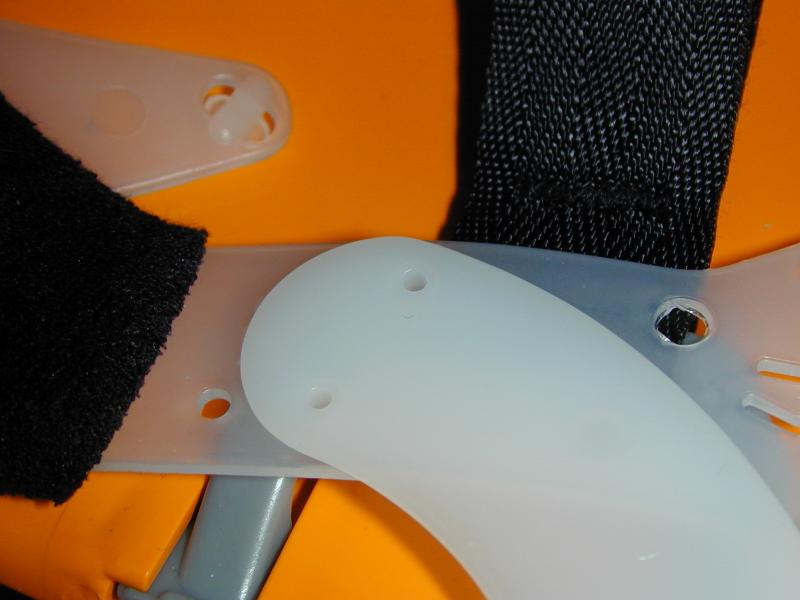  Looking at the plastic headband
I noticed an extra set of holes just behind the sweat band (photo left).
This adjustment will move the part of the headband which goes behind your
head, and houses the ratchet adjustment towards the front. So I popped
out the band and moved it forward and indeed it did provide the clearance
needed. The picture at right shows the new position of the band. Looking at the plastic headband
I noticed an extra set of holes just behind the sweat band (photo left).
This adjustment will move the part of the headband which goes behind your
head, and houses the ratchet adjustment towards the front. So I popped
out the band and moved it forward and indeed it did provide the clearance
needed. The picture at right shows the new position of the band.
The face shield locks in three positions and during all of my testing I
never experienced the shield not staying where I put it. Below are
the 3 different positions of the face shield.
How it works
The respirator operates by sucking air through the pre-filter at the
bottom of the filter assembly and blowing that air at through the cartridge
filters and up into the hard hat at 130 liters per minute. The air enters
the back of the hat and is ducted over your head where it is exhausted
just at the edge of the headband. The air is directed over the inside of
the face shield.
Batteries: When you receive and unpack your respirator the
first thing you need to do is to plug in your battery pack to charge it
up. One of the negatives about the Triton is that while the pack
lasts up to 8 hours (in my three battery life tests it lasted between 7
and 8 hours) it takes at least over night to charge. The first time
you charge it they instruct you to let it charge for 15 hours. Another
battery related issue is that you can't just buy another set of NiCad's
for it, you must buy the battery pack for around $80 which includes not
only the batteries but also the whole motor assembly. A recommendation
I will make to Triton is to have replaceable batteries so that we can purchase
5 extra "D" sized NiCad's and have them in an inexpensive charger,
ready to go. In the current configuration, another needed feature
is a smarter charger. The current charging system is simply a user
timed event. Additionally if you leave the charger on longer than 72 hours
you will damage the batteries. What is needed is a smart charger
which charges the batteries and then reverts to a trickle charge so that
the pack can be plugged in and left alone where it will be ready to go
whenever you need it. With the long charging times and the instructions
to not use the battery pack if the air flow has dropped, I found myself
on at least two occasions needing the respirator, but unable to use it
because it failed the flow test. When that happened, a fully charged
pack was at least 15 hours away.
 All that being said, with a fully charged pack I
could get the stated life out of the filter and it worked well. Also,
if one was using the pack every day charging would be less of an issue
because you could simply plug it in when you were done for the day and
it would be ready for you in the morning. All that being said, with a fully charged pack I
could get the stated life out of the filter and it worked well. Also,
if one was using the pack every day charging would be less of an issue
because you could simply plug it in when you were done for the day and
it would be ready for you in the morning.
The photo at left shows the filter pack being flow tested. Since NiCads
put out a constant voltage right up until they are just about discharged,
the flow will stay within the target throughout the charge until all of
a sudden when it dramatically reduces. You will feel this change in the
mask. At that point it's time to plug in the filter pack..
 Filters: I purposely did not
spend any time testing the filters. First I'm not equipped for such
testing and secondly they are certified. During my evaluation I probably
wore the respirator for a total of about 8 hours in my dusty workshop.
Most of my time with the respirator was spent turning and sanding my turnings.
I also cut up some sheet goods. At the end of it all there was only
a little dust on the pre-filter and absolutely no visible dust on the mask
side of the filter cartridges. One thing to know about the filters
is that they are installed upside down. This is mentioned in the
instruction manual and I believe it's done to to provide a better seal
on the cartridges. Filters: I purposely did not
spend any time testing the filters. First I'm not equipped for such
testing and secondly they are certified. During my evaluation I probably
wore the respirator for a total of about 8 hours in my dusty workshop.
Most of my time with the respirator was spent turning and sanding my turnings.
I also cut up some sheet goods. At the end of it all there was only
a little dust on the pre-filter and absolutely no visible dust on the mask
side of the filter cartridges. One thing to know about the filters
is that they are installed upside down. This is mentioned in the
instruction manual and I believe it's done to to provide a better seal
on the cartridges.
The respirator is strictly for dust protection. Here's a quote
right off the Triton web page: "
Please Note:
The Triton Powered Respirator is not suitable for
use against gases, vapours, chemical fumes or in explosive atmospheres,
for example spray painting."
I have a project coming up this summer where I have
to tear down some horsehair plaster walls and ceilings and the respirator
(and hard hat) will be perfect for that job.
Ergonomics: For me there were some issues
with the respirator's fit and weight. As I mentioned earlier the
ear protectors would not adjust for a comfortable fit. I either need
lower ears or an adjustment in the hat to raise it up a smidge. The
weight of the respirator, which is 36.5 oz according to my local post office,
is not an issue at first and even after long periods of time wearing it
the weight was not a factor as long as I was moving. Operations like
using the table saw were fine but long periods of concentration and little
movement, like while I was turning spindles for hours on end, caused my
neck to get tired.
The most annoying thing about wearing the respirator was
the hose which connects the filter pack to the hat. It just was too
stiff. Because of its stiffness, the headgear was always either being
pushed down over my eyes or tilted back on my head. In my judgment
the only type of hose which would be suitable for this job would be one
designed like one of those plastic dryer hoses. A wire coil with
a very pliable material forming the hose. Send me an email if you
know where to find a 1.5" version of it.
Additionally the hose connected via a tight fit and a clamp to both
head gear and the filter assembly. Because it could not be connected/disconnected
easily this made it cumbersome to handle when donning it or taking it off.
Use: While turning a piece with both eye
and head protection I must admit I felt very secure wearing the respirator.
Breathing the fresh air was an added bonus. There was a little distortion
of my peripheral vision caused by the bubble face shield but looking straight
on was fine. I had just begun turning some spindles for a cradle
and things were progressing well. I had 35 of these to turn.
About an hour and a half into the session my neck was getting stiff...the
weight of the respirator the culprit. Standing relatively still with
my head in about the same position spindle after spindle was taking it's
toll. I removed the respirator and replaced it with my face shield
and I immediately felt better.
Working around the rest of the shop was much better.
I was able to perform all sorts of other tasks without a problem.
Again the annoying thing was the hose pushing the hat down on my face.
I did find that it could get warm under the shroud if I was exerting myself.
The air blowing in front of my face stayed cool but I would start to perspire
around my neck and shoulders under the shroud. Over the course of
the next few turning sessions I again tried to to wear the respirator and
each time after a couple of hours I had to take it off. Maybe it's
just these old bones. I also ran into a low battery situation when
I left it for a week after using it for about 4 hours. Upon testing
the airflow prior to using the respirator, the sitting around had caused
the battery to drain and the flow was under the required lever.
I had to forego using the respirator until the next day.
Accessories: Right after I completed this review I found a company,
Airware America, that sells
replacement parts for the Triton. In addition to the replacements they
offer stick on overlays
which can be used with the Triton as well as other facemasks. Since they
are not made specifically for the Triton they don't fit perfectly, but
they do fit well enough for use and should greatly extend the usable life
of the faceshield.
Conclusion:
Safety isn't free and the Triton Powered Respirator like most safety
devices causes the user some inconveniences. Compared to a face shield
it costs more, weighs more, is hotter to wear, and causes more fatigue.
What you get in return is clean lungs, your sight, your hearing, and few
less bumps on the noggin. That's a fair trade if you ask me.
I've been in contact with Triton USA and they assure me that a new more
flexible hose with quick connect fittings is on the way. The current hose
is the biggest problem with the respirator. If they can solve that issue
and come up with a quicker/smarter way to charge the batteries or even
package the batteries without the motor to reduce cost, then they will
have a real winner here.
UPDATE 9 Jan 2005
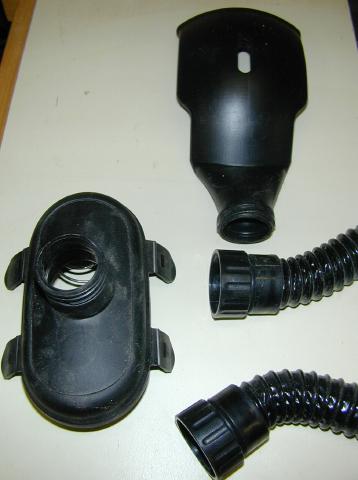 I
just received the hose upgrade kit from Triton USA. The kit includes a
new very flexible hose with quick connect twist fittings, a new cover for
the air filter unit and the hose itself. I
just received the hose upgrade kit from Triton USA. The kit includes a
new very flexible hose with quick connect twist fittings, a new cover for
the air filter unit and the hose itself.
For those who already own the Triton Respirator you can order the upgrade
kit for a fee of $10 including shipping by either calling their retailer
or calling Triton direct at (613)936-2955.
The kit is simple to install and actually does make a world of difference.
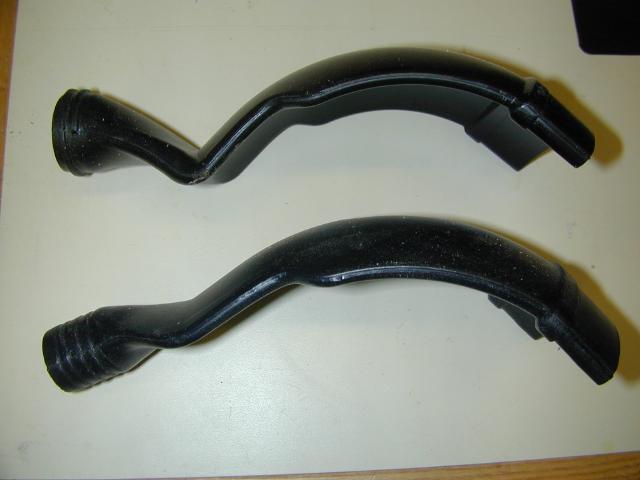
 The
first thing you have to do is remove the old duct. Just pull the shroud
out over the end of the connection duct to give yourself some room. Now
remove the duct which is attached with Velcro. It may come out by itself
or still attached to the front half of the duct. Mine came out in one piece
still connected to the front half, and the Velcro pulled right off the
helmet and both hook and loop were stuck to the duct. I simply pealed
it off the old and installed it on the new. The
first thing you have to do is remove the old duct. Just pull the shroud
out over the end of the connection duct to give yourself some room. Now
remove the duct which is attached with Velcro. It may come out by itself
or still attached to the front half of the duct. Mine came out in one piece
still connected to the front half, and the Velcro pulled right off the
helmet and both hook and loop were stuck to the duct. I simply pealed
it off the old and installed it on the new.
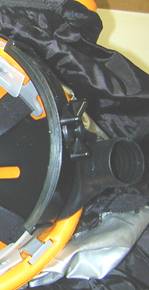
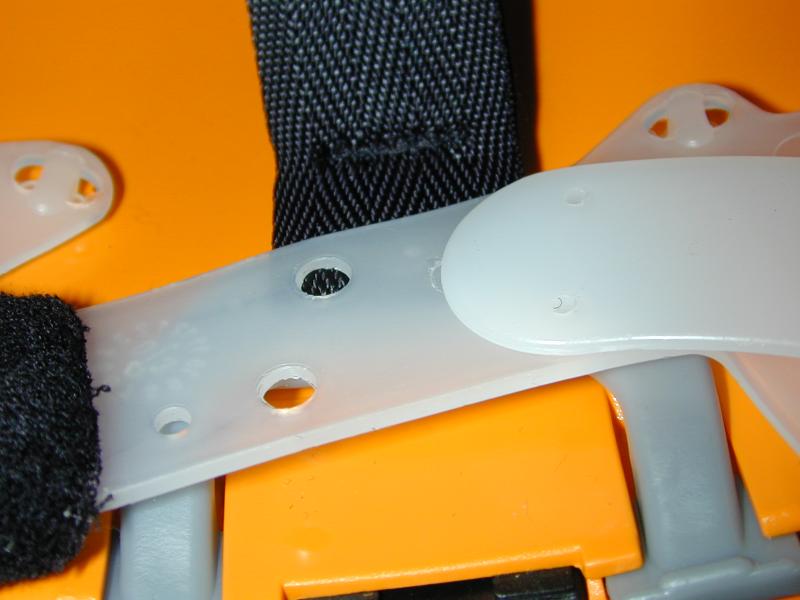
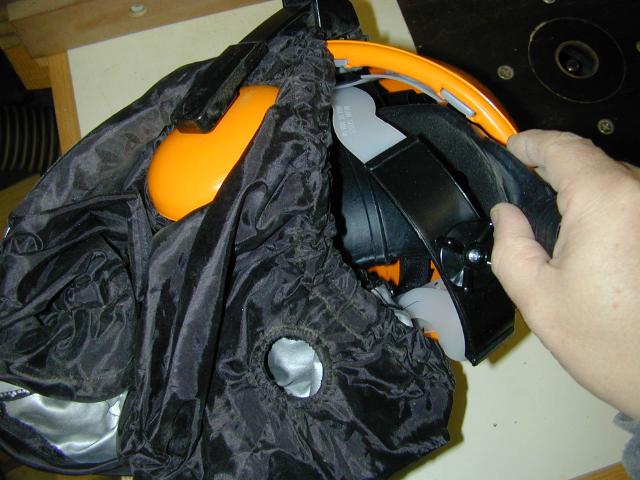
 The
new duct solves two of the problems which I discussed in the review. First
it moves the connection point away from the headband adjustment knob (Top
left) and second it has a screw thread to provide for a quick connect/disconnect
capability. The
new duct solves two of the problems which I discussed in the review. First
it moves the connection point away from the headband adjustment knob (Top
left) and second it has a screw thread to provide for a quick connect/disconnect
capability.
 Now
transfer the velcro to the new assembly and install the duct. With the
new duct installed, you can clearly see that it helps with the interference
problem (right). Put the shroud back on and lets move to the filter assembly.
Simply remove the old cover and replace it with the new. Now
transfer the velcro to the new assembly and install the duct. With the
new duct installed, you can clearly see that it helps with the interference
problem (right). Put the shroud back on and lets move to the filter assembly.
Simply remove the old cover and replace it with the new.
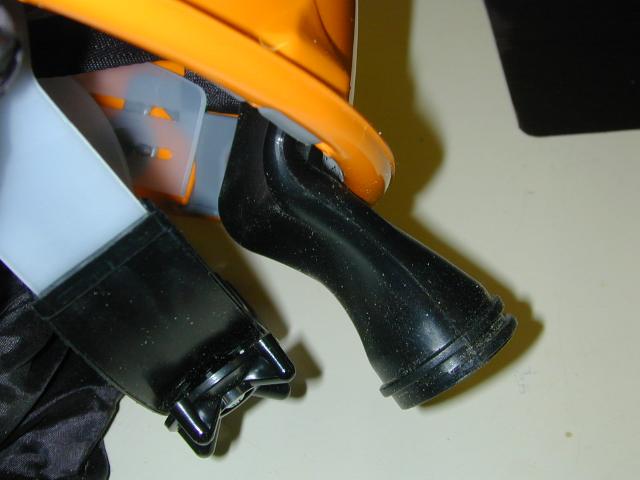
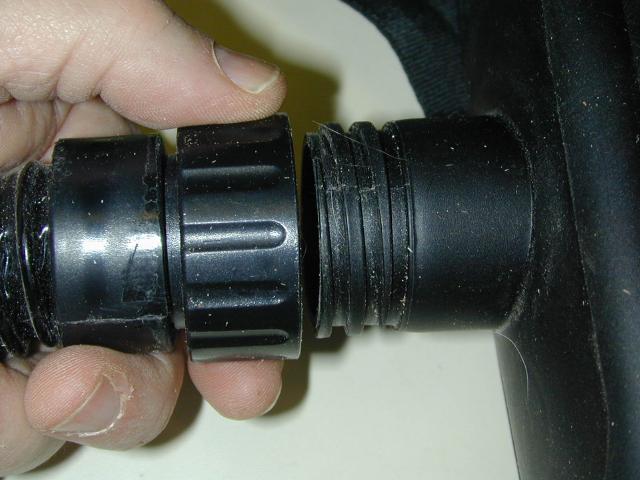 With
the new hose assembly those difficult connection fittings are replaced
with a simple twist collar. The threads are very coarse so it takes about
a full turn to connect up the hose. This is a very welcome addition when
donning the hat and then trying to connect up the hose. With
the new hose assembly those difficult connection fittings are replaced
with a simple twist collar. The threads are very coarse so it takes about
a full turn to connect up the hose. This is a very welcome addition when
donning the hat and then trying to connect up the hose.
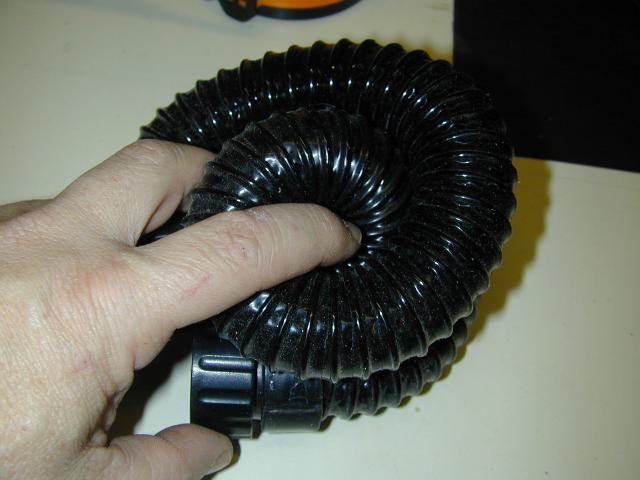 Once
you have it all upgraded you just have to try this out. The new hose makes
all the difference. No longer can you even feel the hose let alone have
the hose apply pressure to the headset. Once
you have it all upgraded you just have to try this out. The new hose makes
all the difference. No longer can you even feel the hose let alone have
the hose apply pressure to the headset.
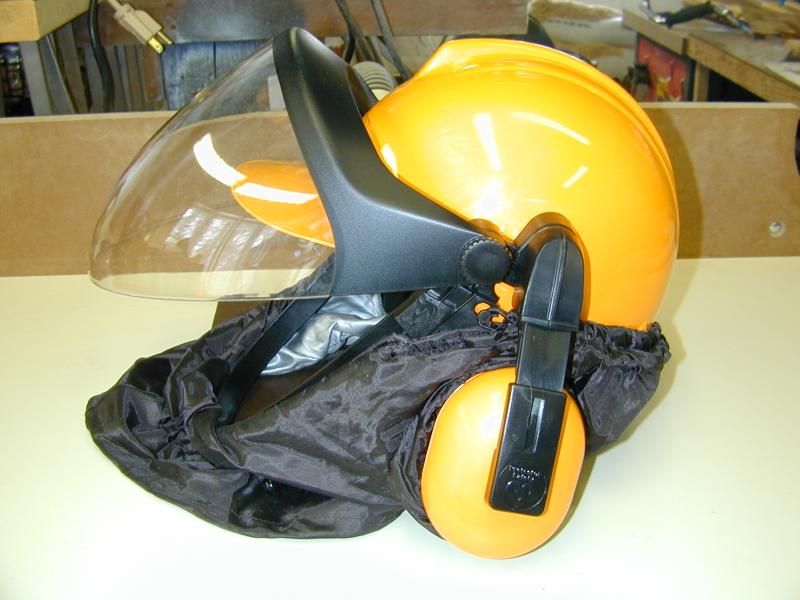
As you can see in the photo at right, the new hose is very light and flexible
and in no way causes any strain on the helmet.
This upgrade is a winner in my opinion and resolves the biggest problem
with the Triton respirator.This is a must have upgrade.
[Home]
26 March 2004
Copyright © 2004-2005 , Bill
Esposito.
All Rights Reserved.
|