Page 3 of 3
Testing and Use:
When I first received the drills I started to think about how I was going to test
them. I thought I could drive hundreds of screws or drill hundreds of holes. I actually
started drilling hole after hole with the 15.6v drill and a 1 3/8" Forstner
bit. Do you have any idea how many curly shavings you get out of a couple of dozen
1 3/8" Forstner bit holes drilled in 2x4's? The pile was getting huge and I
wasn't proving anything. The more I thought about it the more stupid this idea was.
These drills are primarily for woodworkers and woodworkers don't drill a hundred
and fifty 1 3/8" holes without taking a break any more than they drive four
hundred and twenty six 3" deck screws into a cabinet. Each woodworker is going
to use this drill differently and each is going to experience battery life commensurate
with their usage profile.
 What
I decided to do was simply to use these drills for almost two months in the shop,
around the house, and even in sub-freezing weather installing a storm door that
my son-in-law should have done when it was still warm out. I also left the drills
in my unheated shop...something I know I shouldn't do but I wanted to see how they
reacted. During that period of time I did not have to recharge either drill. I used
each and every accessory supplied with the drills. They got dirty, dusty, even a
little Watco on them. One was dropped (not on purpose) and just for those who wanted
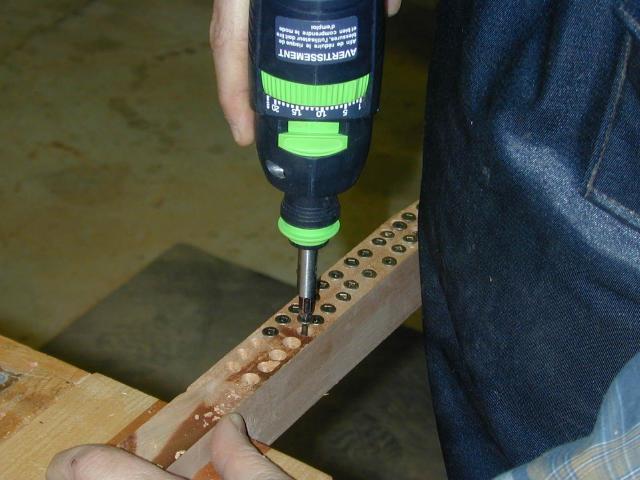
a test, using the 12v drill with a 2 day old charge, I drilled 137 holes with the
3,5mm countersink drill bit 1" deep into cherry and drove 2" square drive
screws into each and then removed them all (so I'm cheap). The test result? The
drill seemed to have as much power at the end as it did in the beginning.
What
I decided to do was simply to use these drills for almost two months in the shop,
around the house, and even in sub-freezing weather installing a storm door that
my son-in-law should have done when it was still warm out. I also left the drills
in my unheated shop...something I know I shouldn't do but I wanted to see how they
reacted. During that period of time I did not have to recharge either drill. I used
each and every accessory supplied with the drills. They got dirty, dusty, even a
little Watco on them. One was dropped (not on purpose) and just for those who wanted
a test, using the 12v drill with a 2 day old charge, I drilled 137 holes with the
3,5mm countersink drill bit 1" deep into cherry and drove 2" square drive
screws into each and then removed them all (so I'm cheap). The test result? The
drill seemed to have as much power at the end as it did in the beginning.
I performed that same type of test using the 15.6v though not more than twenty or
so screws. What I noticed was that while the drilling seemed to operate the same,
the driving of the screws seemed much faster. Since the difference between the two
drills in no-load rpm while in low gear is only 20rpm, I can only conclude that
the higher voltage and torque of the 15.6v caused that drill to operate much closer
to the no-load rpm than the 12v drill.
 I received a number of accessories for the CENTROTEC chuck.
These included assorted drill bits, countersinks, bit holders and driver bits.
I received a number of accessories for the CENTROTEC chuck.
These included assorted drill bits, countersinks, bit holders and driver bits.
Unfortunately for us Americans, everything is in metric. Here's a link to an equivalents table.
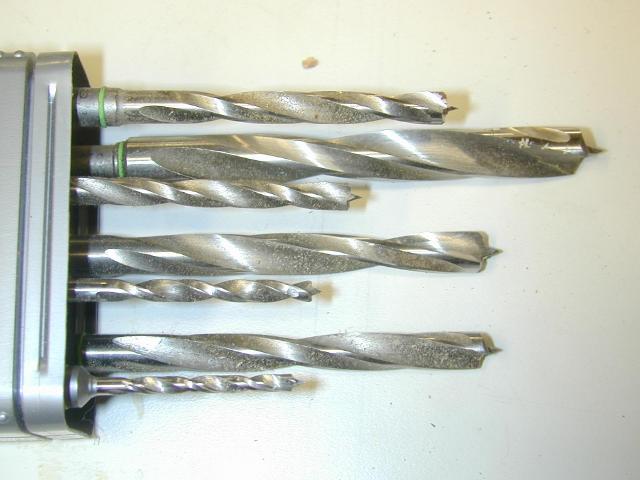 The woodworking
bit set contains a 3mm, 4mm, 5mm, 6mm, 7mm, 8mm, and 10mm brad point bits. These
have the CENTROTEC shank and can only be used in that chuck. You can also purchase
these bits separately. They all worked great and watching one of them spinning you
can see that they run very true due to the CENTROTEC chuck. Looking at the equivalents
table you'll see that 1/8 and 3mm are very close, .1250 and .1181. The rest are
close as well, should certainly close enough to fractional equivalents for most
of our requirements in wood.
The woodworking
bit set contains a 3mm, 4mm, 5mm, 6mm, 7mm, 8mm, and 10mm brad point bits. These
have the CENTROTEC shank and can only be used in that chuck. You can also purchase
these bits separately. They all worked great and watching one of them spinning you
can see that they run very true due to the CENTROTEC chuck. Looking at the equivalents
table you'll see that 1/8 and 3mm are very close, .1250 and .1181. The rest are
close as well, should certainly close enough to fractional equivalents for most
of our requirements in wood.
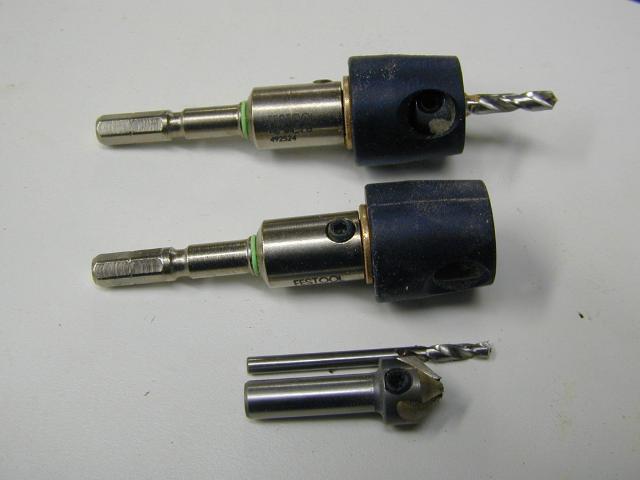
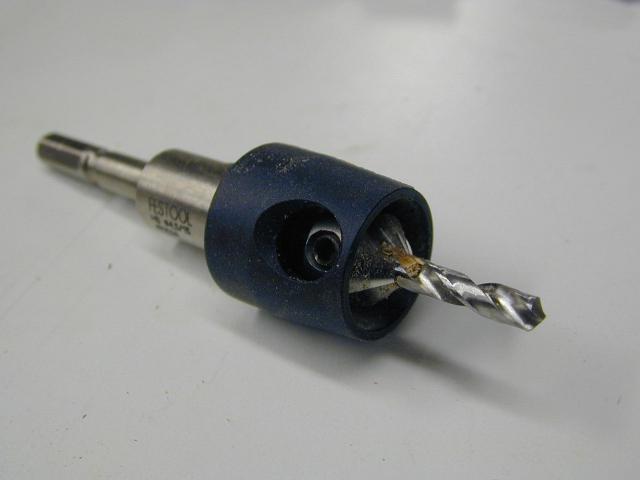 These next two bits
performed great although I did once mark the work with the depth stop. The countersink
and stops work well and like the ones mentioned above, the bits run very true. These
countersinking bits come in 3.5mm and 4.5mm. In fractions they are close to 9/64th
and 11/64ths. In the picture at right you see the top bit is assembled, the lower
bit has been disassembled into three pieces. The main CENTROTEC bit assembly with
the free rotating depth stop, the actual bit and the countersink.
These next two bits
performed great although I did once mark the work with the depth stop. The countersink
and stops work well and like the ones mentioned above, the bits run very true. These
countersinking bits come in 3.5mm and 4.5mm. In fractions they are close to 9/64th
and 11/64ths. In the picture at right you see the top bit is assembled, the lower
bit has been disassembled into three pieces. The main CENTROTEC bit assembly with
the free rotating depth stop, the actual bit and the countersink.
To assemble the bit and set the countersink depth, first insert the bit into the
countersink body adjusting the bit for the depth of cut you like. Tighten the set
screw on the countersink body (photo below, right side). Next insert the countersink
body into the the main bit assemble and adjust it for the depth of countersink you
desire. Then tighten its set screw (photo below, left side)
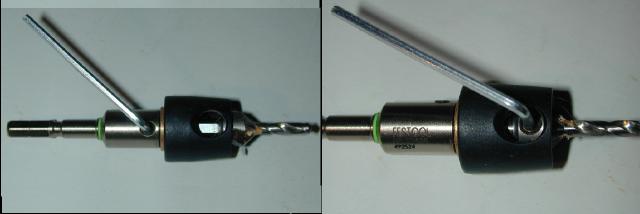
Next I tried something I know all you Americans are going to want to try. I replaced
the 3.5mm bit with a 1.8" bit. The results weren't great but may be passable
for some. The photo below on the left shows the countersink and the 3.5mm bit. Fits
nice and tightly. The photo in the middle shows the same countersink with the 1/8"
drill...notice it is off center because it is smaller and the set screw pushes it
to one side. The photo at the right shows the results, a countersink which is offset
from the hole (countersink on the left in that photo).

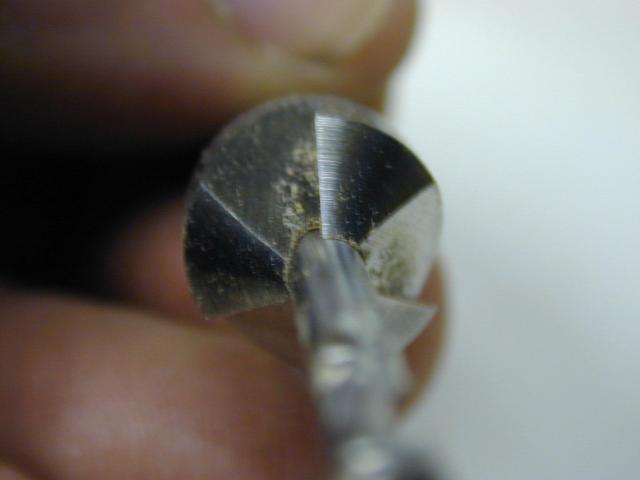
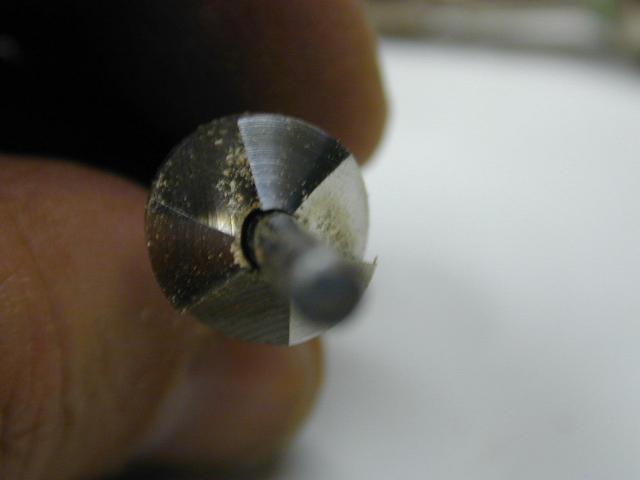
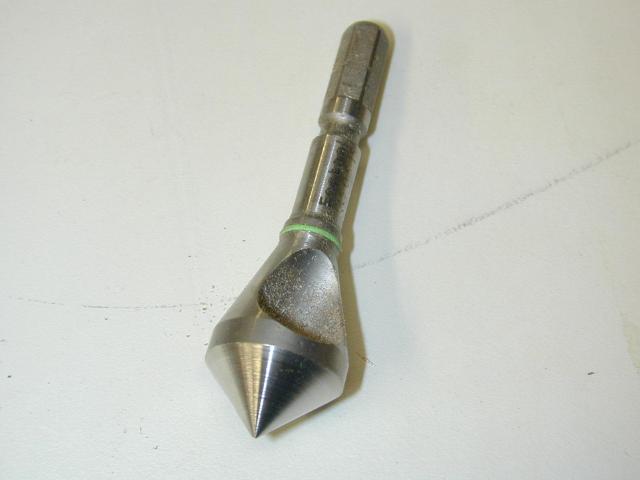 Another
bit I used was a stand alone countersink. It is sharp and cuts well but I have never
been able to master this type of bit. I found it impossible to keep the countersink
centered on the hole if the hole was drilled first and if I drill the countersink
first it can still drift to one side or the other. For concealed work this is ok,
but for a brass screw which needs to be located precisely because it is visible,
I find this method un-precise. Additionally, I cannot get consistent depths with
this bit.
Another
bit I used was a stand alone countersink. It is sharp and cuts well but I have never
been able to master this type of bit. I found it impossible to keep the countersink
centered on the hole if the hole was drilled first and if I drill the countersink
first it can still drift to one side or the other. For concealed work this is ok,
but for a brass screw which needs to be located precisely because it is visible,
I find this method un-precise. Additionally, I cannot get consistent depths with
this bit.
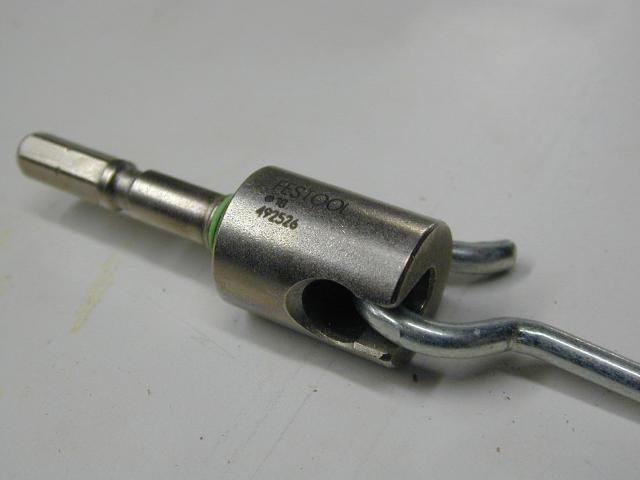 Ok,
so this is one cool bit. It is called a hook adapter. You use this to drive hooks.
Be careful, this bit in combination with the 12v drill quickly snapped this hook
off as I was driving it into a pre-drilled hole in cherry. Yea the hook was cheap
but it illustrates the amount of torque you can quickly put on the hook...something
they will normally never see.
Ok,
so this is one cool bit. It is called a hook adapter. You use this to drive hooks.
Be careful, this bit in combination with the 12v drill quickly snapped this hook
off as I was driving it into a pre-drilled hole in cherry. Yea the hook was cheap
but it illustrates the amount of torque you can quickly put on the hook...something
they will normally never see.
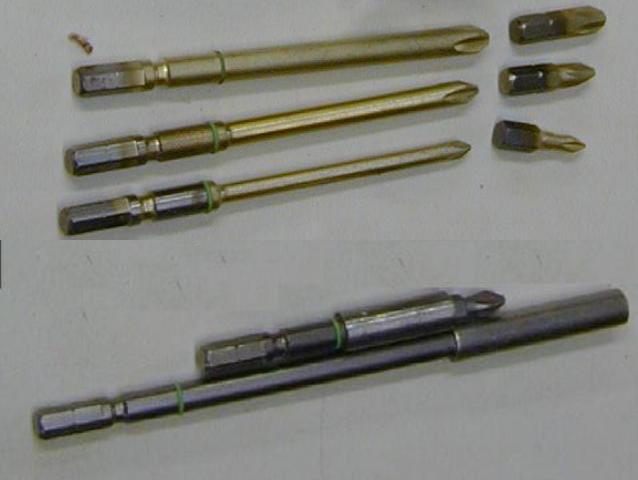 This last batch of bits are the CENTROTEC Phillips
(longer Phillips) and the NovaDrive Phillips. By the name you know where the longer
Phillips go, and I'm showing #1, #2 and #3 points there. The NovaDrive bits pop
in the end of the bit extenders or the end of the TDK motor shaft. Below the Phillips
bits is the bit adapter (small one) and the bit extender. Both serve to hold NovaDrive
bits of any bit of your choosing including square drive. They are magnetic.
This last batch of bits are the CENTROTEC Phillips
(longer Phillips) and the NovaDrive Phillips. By the name you know where the longer
Phillips go, and I'm showing #1, #2 and #3 points there. The NovaDrive bits pop
in the end of the bit extenders or the end of the TDK motor shaft. Below the Phillips
bits is the bit adapter (small one) and the bit extender. Both serve to hold NovaDrive
bits of any bit of your choosing including square drive. They are magnetic.
The Drop Test
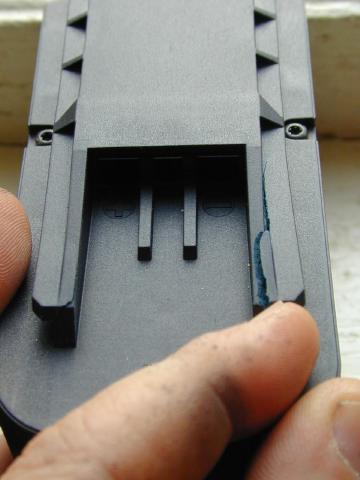 I
didn't mean to do it, honest. I was installing my Jet Air Cleaner with my son's
help and we each had one of the TDK's. Mine was laying on the top of a 5 foot step
ladder. I made the wrong move and my hip knocked if off the ladder. I'd like to
tell you how it hit the concrete floor but these drills were about two days old
when this happened and I just closed my eyes. At first when I pick it up and inspected
it I didn't see any damage. While using it further I noticed that the battery felt
loose. A closer inspection revealed a cracked battery mounting rail (right). At
first I was disappointed. These drills were well made and appeared to be, and I
believe they are heavy duty. After further thought I had to concede that 5 feet
down to concrete was a pretty severe drop and apparently it hit just right to break
the battery rail. I took some pictures and emailed them to Festool who has sent
them off to their engineers. I suppose if something had to break better this than
something else, after all, the drill was still totally functional.
I
didn't mean to do it, honest. I was installing my Jet Air Cleaner with my son's
help and we each had one of the TDK's. Mine was laying on the top of a 5 foot step
ladder. I made the wrong move and my hip knocked if off the ladder. I'd like to
tell you how it hit the concrete floor but these drills were about two days old
when this happened and I just closed my eyes. At first when I pick it up and inspected
it I didn't see any damage. While using it further I noticed that the battery felt
loose. A closer inspection revealed a cracked battery mounting rail (right). At
first I was disappointed. These drills were well made and appeared to be, and I
believe they are heavy duty. After further thought I had to concede that 5 feet
down to concrete was a pretty severe drop and apparently it hit just right to break
the battery rail. I took some pictures and emailed them to Festool who has sent
them off to their engineers. I suppose if something had to break better this than
something else, after all, the drill was still totally functional.
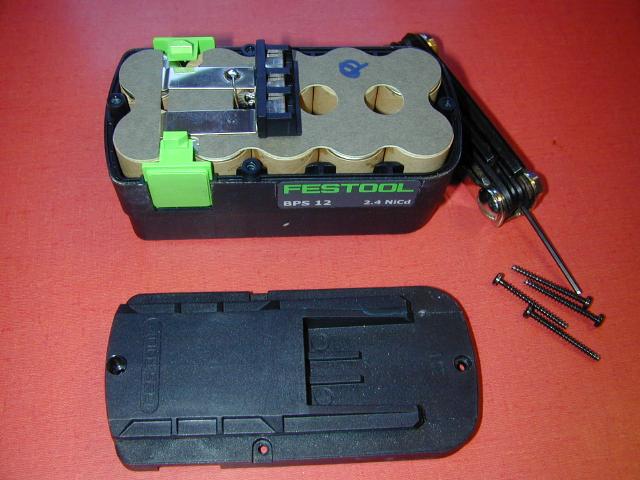 Festool
would normally send off just the replacement part (remember those detailed parts
diagrams from the first page?) but in this case the replaced the whole battery assembly.
Actually I would have perferred the part so I could try to replace it myself. Not
to be deterred, I took it upon myself to see just how hard it would be to replace
the part. Four screws later and the cover was off (left)...nothing sprung out when
I opened it up. It was a really simple operation. The screws are actually Torx and
I don't have a set but I found an Allen just the right size for the repair.
Festool
would normally send off just the replacement part (remember those detailed parts
diagrams from the first page?) but in this case the replaced the whole battery assembly.
Actually I would have perferred the part so I could try to replace it myself. Not
to be deterred, I took it upon myself to see just how hard it would be to replace
the part. Four screws later and the cover was off (left)...nothing sprung out when
I opened it up. It was a really simple operation. The screws are actually Torx and
I don't have a set but I found an Allen just the right size for the repair.
Warranty
Speaking of repair, Festool has a great warranty. The TDK comes with a 3 year warranty.
The drills are warranted for defects in materials and workmanship for a period of
3 years and there is no exclusion for commercial use. If a problem occurs within
the first year, Festool will pay for shipping BOTH ways. If the problem occurs during
year 2 or 3, Festool will pay for return shipping to you only. I don't think I've
ever seen any product where the manufacturer payed for shipping both ways.
Conclusion
In the past I have found that Festool products live up to my expectations and the
TDK drills are no exception. They had plenty of power, plenty of torque and plenty
of accessories. Because of the CENTROTEC chucking system I believe these are the
truest running drills I've ever used and with the ability to quickly change entire
chucks to one more suitable for the current task is extremely productive. Ergononicaly
the grip might be a bit small for large hands but balance is great.
As with all Festool products these drills command a premium price but only each
individual user can determine whether or not the benefits of these products are
worth the added cost. I think these are the most versatile cordless drills I've
come across and the chucking options alone make this drill more valuable than others.
What I do find excessively costly is the fact that you cannot purchase a TDK with
NiMh batteries. The cost of adding a single NiMh 3ah battery to the 15.6v drill
is $142 where if it was an option when you purchased the drill (a NiCd or an NiMh
version) you could probably reduce that cost by more than half.
If I could have only one drill I would pick the 15.6v simply because there really
is not a significant size or weight difference between it and the 12v model and
the 15.6v appears to significantly have more torque. I would also surely purchase
at least the eccentric chuck. The CENTROTEC accessories, at about the same price
as high quality drill bits, really make for a true running, quick change tool and
the included FastFix chuck lets you use all your current bits.
Festool has a 30 day no questions asked money back garauntee so if you are in the
market for a high quality, heavy duty, versatile cordless drill/driver package I
think the TDK's are worth a look.
[Page 1] [Page 2] [Page
3]
[Home]