
Triton 2-1/4HP Plunge Router
MOF001 KC
by
1 July 2006
Dust Collection:
 Top
side dust collection is really outstanding on the Triton. It is as good as
any I've used. The connector however works best with a soft, tapered
nozzle. My Festool hosed fit great, the tapered Shop Vac hose fit OK and
the hard plastic nozzle of my Fein could be forced in but I wouldn't trust it.
Top
side dust collection is really outstanding on the Triton. It is as good as
any I've used. The connector however works best with a soft, tapered
nozzle. My Festool hosed fit great, the tapered Shop Vac hose fit OK and
the hard plastic nozzle of my Fein could be forced in but I wouldn't trust it.
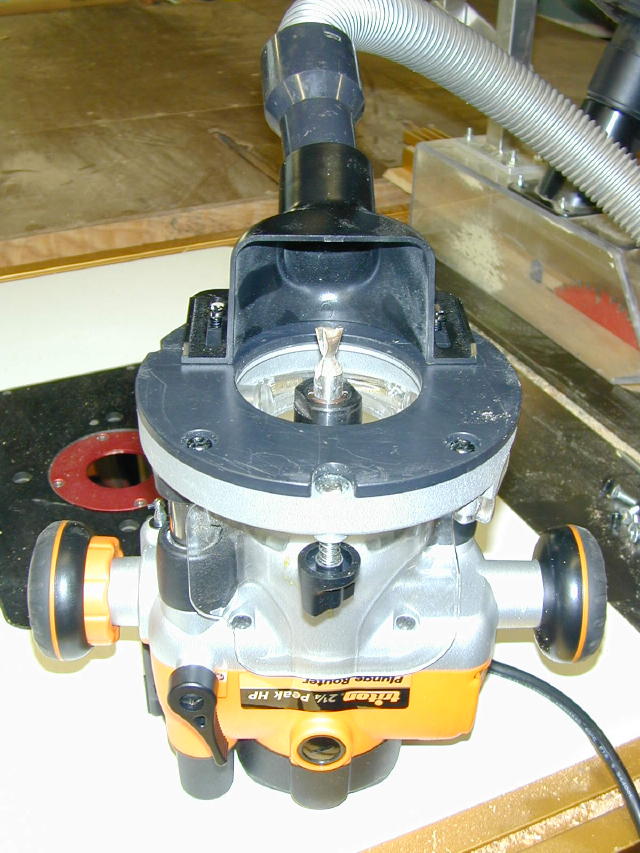
The bottom side dust collector can be attached directly to the router base, as shown at right, for use with either a bearing bit used for edge treatment or a dovetail jig. In this picture you see my Fein hose attached and can see the tenuous connection. Like all bottom side collection many factors play into its effectively.
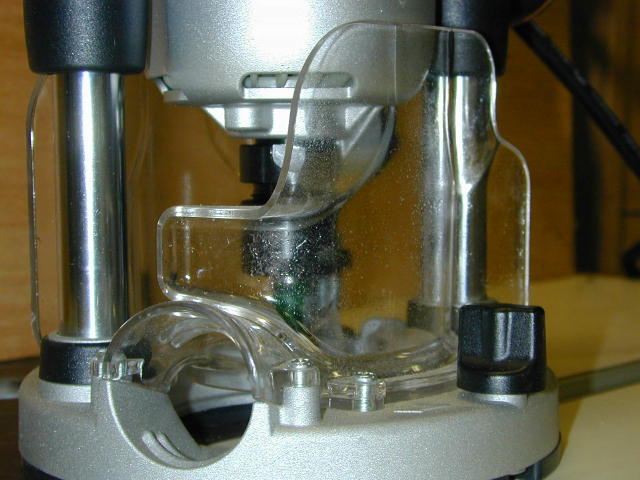
 Another
issue which I thought might be a problem is the location of the top side dust
collection port. In order to fit in the new above table winder the dust port
had to be relocated to the left side of the router. This means that for a
right handed operator the dust port is on top of the work when using the guide
plate and fence, as shown in the photo at left. I initially thought this
to be a problem but in use as long as you have a good long vacuum hose it is not
an issue (Festool hose installed).
Another
issue which I thought might be a problem is the location of the top side dust
collection port. In order to fit in the new above table winder the dust port
had to be relocated to the left side of the router. This means that for a
right handed operator the dust port is on top of the work when using the guide
plate and fence, as shown in the photo at left. I initially thought this
to be a problem but in use as long as you have a good long vacuum hose it is not
an issue (Festool hose installed).
Collets:
 The
Triton MOF001 comes with two self releasing collets, 1/4" and 1/2". If
you're not familiar with a self releasing collet it can be confusing at first.
I've read many a plea for help from people who's collet was loose but the bit
was stuck in. To remove a bit from a self releasing collet first loosen
the collet until the collet is loose. Actually at this point the only thing
that is loose is the nut. Now loosen the collet some more until it gets
tight and then loose again. What happens is that once the nut is free when
you first loosen it, you continue to loosen it until the play between the nut
and sleeve is taken up and it gets tight again. Continuing to loosen the
nut actually pulls the tapered sleeve up and out of the arbor shaft (collet
chuck) thus
releasing the bit.
The
Triton MOF001 comes with two self releasing collets, 1/4" and 1/2". If
you're not familiar with a self releasing collet it can be confusing at first.
I've read many a plea for help from people who's collet was loose but the bit
was stuck in. To remove a bit from a self releasing collet first loosen
the collet until the collet is loose. Actually at this point the only thing
that is loose is the nut. Now loosen the collet some more until it gets
tight and then loose again. What happens is that once the nut is free when
you first loosen it, you continue to loosen it until the play between the nut
and sleeve is taken up and it gets tight again. Continuing to loosen the
nut actually pulls the tapered sleeve up and out of the arbor shaft (collet
chuck) thus
releasing the bit.
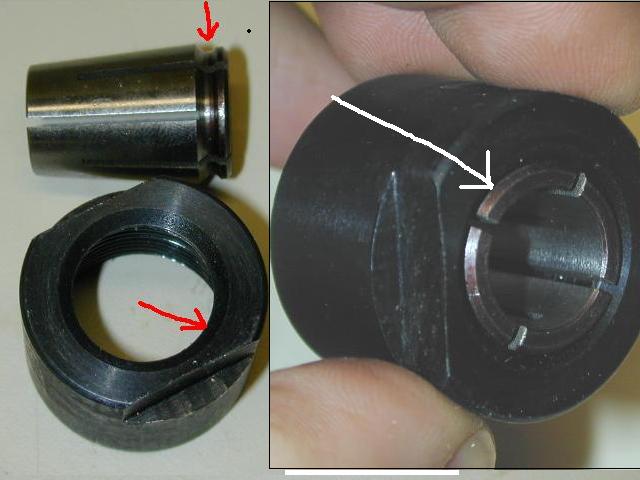
 The
photo at left is the disassembled collet. The sleeve gets inserted into
the nut and snaps into place. It is the play between the groove in the sleeve
and the lip on the nut (photo left, red arrows) that causes the collet to feel
like it is loose when you first release it.
The
photo at left is the disassembled collet. The sleeve gets inserted into
the nut and snaps into place. It is the play between the groove in the sleeve
and the lip on the nut (photo left, red arrows) that causes the collet to feel
like it is loose when you first release it.
To view a short video of an above table bit change click on the photo at right.
| TIP: When I received my router the collet was not properly assembled. This caused me to ruin a bit because when I tightened the collet, the nut was actually sitting on top of the sleeve and jammed the sleeve into the arbor. Releasing the nut did not pull the sleeve up out of the arbor so I had to resort to a pair of pliers. When you first get your router remove the collet and make make sure it is assembled as shown (photo above left, white arrow). |
Accessories:
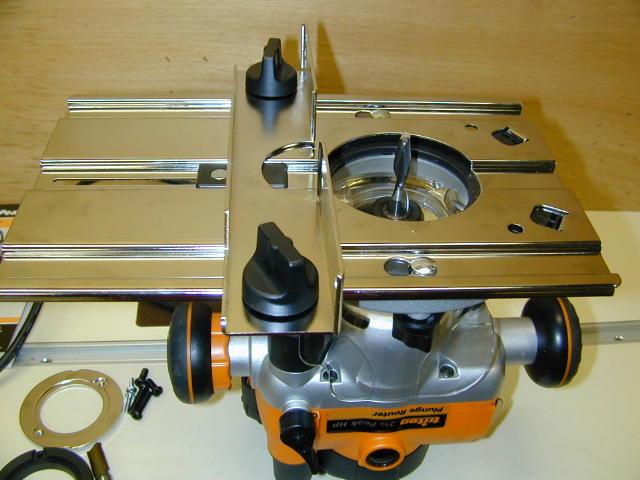
The MOF001KC comes with a different kind of auxiliary baseplate and fence than you may be used to. The all metal plate boasts tool-less attachment. Just loosen the two thumb knobs on the routers base enough so that they can fit through the keyholes in the auxiliary baseplate (left). Once attached the fence just slides onto the plate and is secured in position with its own set of thumb knobs (right).

I have not had a chance yet to use the guide bushings but their design seems adequate. Included in the set are 5/16, 3/8, 7/16, 1/2, 5/8, 51/64 and 3/4" and I checked them all with a caliper and they were accurate. In the photo at left "A" is the PC bushing adapter, "B" is the Triton Bushing adapter and "C" is a table spacer to raise the bushing up to account for table insert thickness.
I will use the bushings with my Leigh jog and update this section with the results.
Testing and Usage:
Triton has improved on just about every feature of the TRC001 3-1/4hp router. The winder mechanism feels like it is using more metal gearing and the new push button winder lock is a welcome improvement over the old turn lock. The old binding of the fine adjustment problem which some early Triton routers experienced when mounted in the table is not apparent with the new MOF001. They have added a spring return to the plunge lock lever so now it's either located in the locked or unlocked position instead of flopping around loose. I remember writing the Triton engineers a couple of years ago asking for rubber anti-slip grips on the handles...that too has been added.

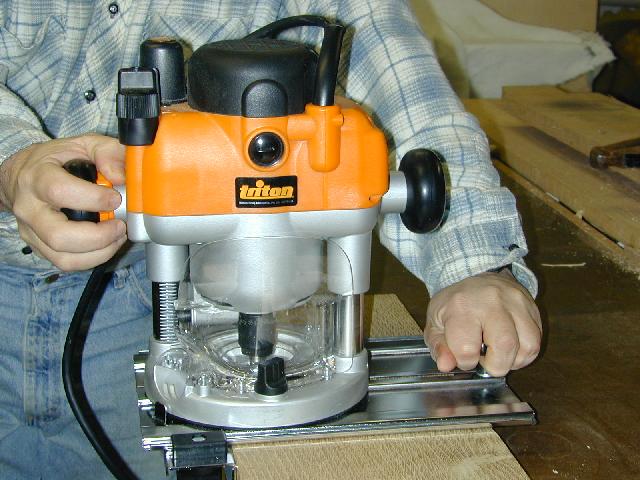
 Size
wise the MOF001 is quite a bit smaller than the 3-1/4hp TRC001. In the
picture at left I have the routers plunge to about 1/2" from flush. I've
seen many a write up of the Triton where the author complained about top
heaviness but I've not experienced that. Perhaps it is because in normal
use the router is plunged and that brings the handles down considerably lower.
Size
wise the MOF001 is quite a bit smaller than the 3-1/4hp TRC001. In the
picture at left I have the routers plunge to about 1/2" from flush. I've
seen many a write up of the Triton where the author complained about top
heaviness but I've not experienced that. Perhaps it is because in normal
use the router is plunged and that brings the handles down considerably lower.
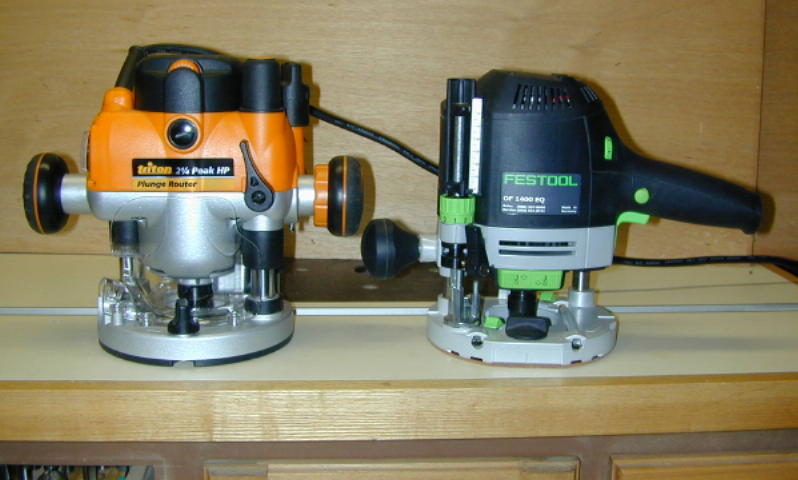
The pic at right has both the Triton and the Milwaukee set with the collets at the same height and you can see that while the handles are higher, the Triton is actually just a bit shorter. For real delicate work I would be using either the included offset base or one of Pat Warner's.
 One
more size/height comparison, again both collets set at the same height.
One
more size/height comparison, again both collets set at the same height.
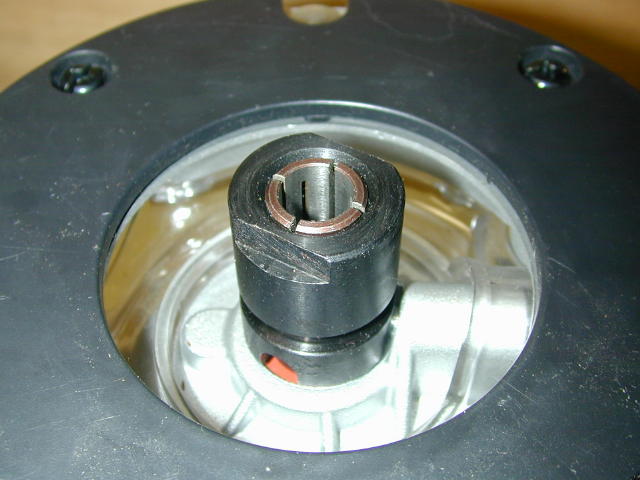
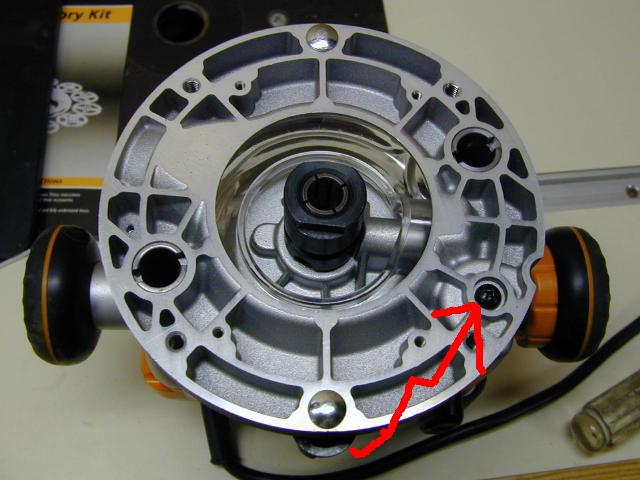 One
problem I noticed which is fixed easily is the depth stop turret. The
nylon bodied turret is attached to the base with a sheet metal screw. That
worked fine until I rotated the turret counterclockwise a few times which in
turn backed out the screw causing the turret to be loose. To remedy this
you need to remove the plastic base plate where you'll see the screw (arrow
points to it at right). What has to be done is carefully remove the screw
which releases the turret assembly. I said turret assembly because the turret
has a spring and a ball bearing under it which act as the detent when you twist
it so be careful not to lose them. Now the fix, a drop of glue, I used CA,
in the hole and reassemble everything. Tighten it to where the turret
doesn't wiggle but still rotates properly and let it dry.
One
problem I noticed which is fixed easily is the depth stop turret. The
nylon bodied turret is attached to the base with a sheet metal screw. That
worked fine until I rotated the turret counterclockwise a few times which in
turn backed out the screw causing the turret to be loose. To remedy this
you need to remove the plastic base plate where you'll see the screw (arrow
points to it at right). What has to be done is carefully remove the screw
which releases the turret assembly. I said turret assembly because the turret
has a spring and a ball bearing under it which act as the detent when you twist
it so be careful not to lose them. Now the fix, a drop of glue, I used CA,
in the hole and reassemble everything. Tighten it to where the turret
doesn't wiggle but still rotates properly and let it dry.
Another problem that I noticed is with the power cord...it just isn't long enough. In order to plug the Triton into my Festool vacuum to take advantage of the auto-start feature of the vac, I had to use an extension cord. The Triton's cord was not long enough by itself to be used without causing a tripping hazard.
The last issue I had was with the soft start. My initial impression was that the soft start just wasn't all that soft. While not exhibiting loads of torque the Triton will jerk in your hand when you start it up. I checked with Triton and all the MOF001 routers act about the same. Maybe I've become spoiled as I no longer own any routers without soft start. I can't compare to those without the feature but in this case the amount of torque seemed to warrant some comparison testing with other electronically controlled routers. I lined up my Festool OF1400, Milwaukee 5616, Triton TRC001 and the Triton MOF001. I repeatedly started each router at low and high speed and tried to gauge, albeit subjectively, the startup torque. It was of no surprise to me that the MOF001 exhibited the greatest startup torque, however what was surprising was that is was only slightly greater than the Milwaukee. I alternated between the Milwaukee and the Triton over and over again. The difference was so small and in my opinion inconsequential that after performing this testing I have to assert that the performance of the Triton's soft start is virtually on par with that of the Milwaukee.
Table Mounting:

 To
install the router in the table you'll need a hole layout which is the same as
for the PC 7518. With the router mounted to the insert and oriented
properly to suit your table, mark the insert at the indent for the crank on the
router base (left). Now over at the drill press line up the circumference
of your 1/2" drill bit up with the indent you drew on the insert, and
drill (right).
To
install the router in the table you'll need a hole layout which is the same as
for the PC 7518. With the router mounted to the insert and oriented
properly to suit your table, mark the insert at the indent for the crank on the
router base (left). Now over at the drill press line up the circumference
of your 1/2" drill bit up with the indent you drew on the insert, and
drill (right).
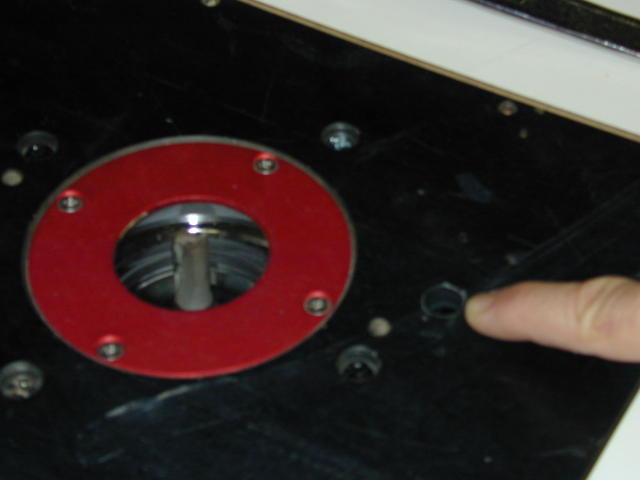

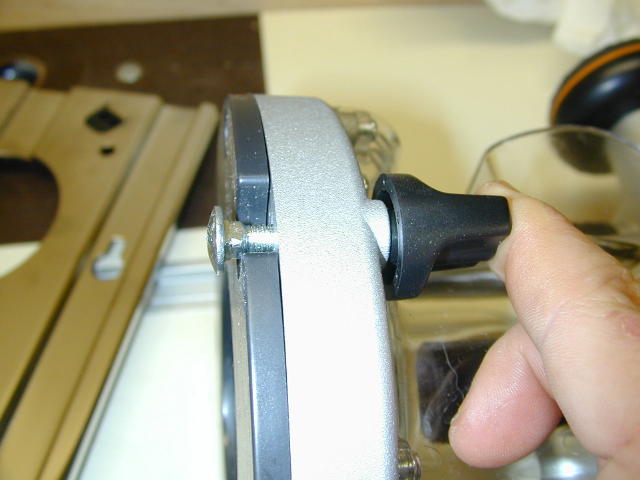
Remount the router and install the insert into the table. My finger points to the winder crank hole I just drilled (left).
To view a short clip of the above table
adjustment in action just click on the photo at right.
Routing:

 Here
are a couple of short clips of the Triton in action. Because I'm
positioning myself so the camera gets a good shot of the router, my stance
is a bit out of balance and thus so are my motions. In the clip at left
I'm using a round over bit on a piece of pine. I have the bottom side dust
collection hooked up to my Festool vac. Very little dust escaped. Of
course nothing is dust free but this attachment did a remarkable job of
collecting the waste.
Here
are a couple of short clips of the Triton in action. Because I'm
positioning myself so the camera gets a good shot of the router, my stance
is a bit out of balance and thus so are my motions. In the clip at left
I'm using a round over bit on a piece of pine. I have the bottom side dust
collection hooked up to my Festool vac. Very little dust escaped. Of
course nothing is dust free but this attachment did a remarkable job of
collecting the waste.
The next video (at right) I installed the extended baseplate, fence set to cut about 2" in from the edge and a 1/2" straight bit. In a piece of pine I cut a stopped dado. I plunged the bit with the winder, routed the dado, then raised the bit and turned off the router. I had top side dust collection going with the hose connected to the left side of the router. With enough hose and power cord the fact that Triton had to compromise and put the dust port on the left had no affect on my ability to rout.

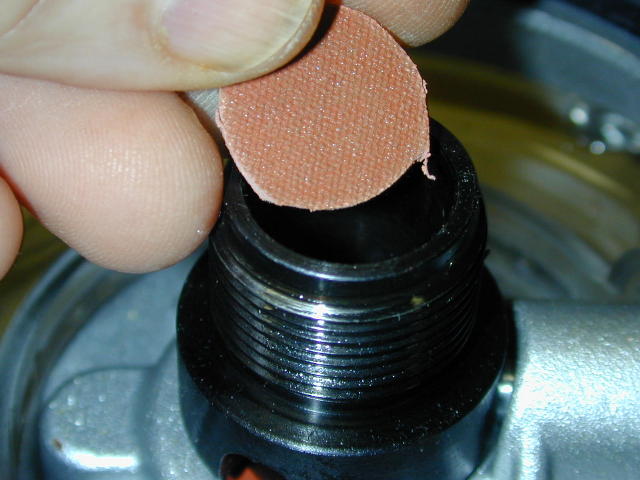
Here's a tip, in the bit change video you may have noticed that I just inserted the bit all the way and tightened it. Typically that is something you don't want to do because you don't want the bit touching the end of the arbor for vibration reasons. What I do to all my routers is shown in these two pictures. I remove the collet and insert a thin piece of rubber, then replace the collet. Now I can just drop the bit in and the rubber acts as a spacer.
Here's another tip. By adding a knob to
the Triton baseplate you can turn it into an offset baseplate as in the photo at
right of the larger Triton TRC-001. Just get a knob and a longer screw for
the circle cutting accessory.
Conclusion:
As I stated in the review, just about every feature of the new MOF001KC is an upgrade from the previous model. Size, weight and the ergonomics of the controls feel good. Dust collection is outstanding. The above table bit change and height adjustments work great as do the adjustments when using the router hand held. The included baseplate, fence and guide bushings just add to the value. I'd really like to see the power cord lengthened to about 12 feet and the soft start electronics tweaked to reduce the startup torque. All and all the Triton MOF001KC seems to be a well thought out next generation of the original innovative Triton design and should serve you well as both a hand held and table mounted router.
[Page 1] [Page 2]