Admittedly, before being asked to review this fence I had looked
at the TS-III often but never seriously considered it. Even though every Incra owner
with whom I had communicated loved it, my thoughts were that the fence was too precise
and too gimmicky for the average hobbyist...like myself. Well my impression
has certainly changed since the TS-III was installed on my saw. I don't think
my old after-market fence will be re-installed any time soon!
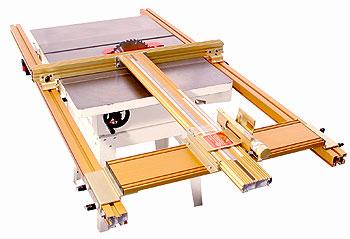
Yes the Incra TS-III is high tech and a design departure from
traditional fences but it is also rock solid, accurate, versatile, expandable, and
a joy to use. Couple those attributes with the great customer service reputations
of Incra and its distributors like Woodpeckers and you have a complete package which
is hard to beat.
If I've piqued your interest, please read on. As usual with my
reviews I will strive to supplement the text with pictures depicting all aspects
of the installation and use of the product. You can then make an informed purchase
decision and not be surprised by anything included in the box. You can click on
any picture to enlarge it.
Index:
Before you Buy
 Let's get the only bad news
out of the way right now. Probably the only drawback to the TS-III is the space
it requires. This is not an issue for me but it may be for someone with a very small
work area. Even though the right hand rip capacity is 32", because of the innovative
design of the TS-III, you will need approximately 65" to the right
of your saw's cast table if you want to utilize the full rip capacity of this
fence system.
Let's get the only bad news
out of the way right now. Probably the only drawback to the TS-III is the space
it requires. This is not an issue for me but it may be for someone with a very small
work area. Even though the right hand rip capacity is 32", because of the innovative
design of the TS-III, you will need approximately 65" to the right
of your saw's cast table if you want to utilize the full rip capacity of this
fence system.
What's in the box:
 When you receive your TS-III fence it will arrive in three boxes.
One box contains the 72"-long rails, a second contains the Ultra 2/32, and
the third the fence and mount. They all arrived at the same time and without
damage.
When you receive your TS-III fence it will arrive in three boxes.
One box contains the 72"-long rails, a second contains the Ultra 2/32, and
the third the fence and mount. They all arrived at the same time and without
damage.
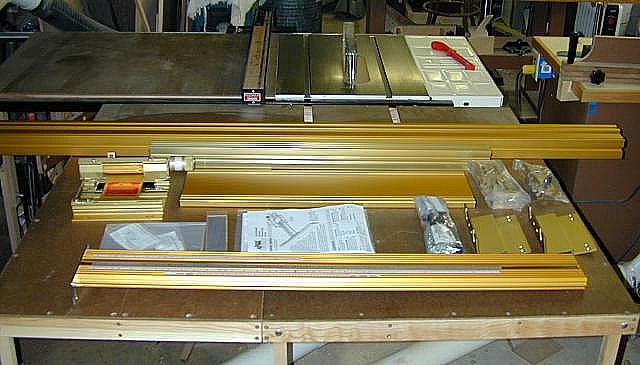 The picture (left) displays all the parts,
hardware and instructions. Speaking of hardware, I'll say it now and will
probably iterate it again further down, Incra does a great job packaging their hardware.
The picture (left) displays all the parts,
hardware and instructions. Speaking of hardware, I'll say it now and will
probably iterate it again further down, Incra does a great job packaging their hardware.
The fence system itself is constructed almost entirely from extruded aluminum. All
parts, with the exception of the hardware, are finished in an attractive gold colored
anodizing. The fit and finish is excellent and there are no sharp corners or burrs.
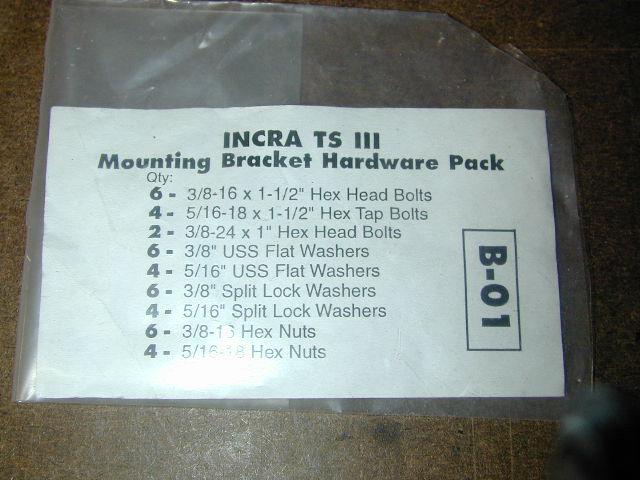 As
one would expect all pieces of hardware are listed in their excellent instructions
but the unexpected surprise is that they individually package the hardware by assembly
step. So while you're reading the instructions you see statements like; "use
the 6 10-32 screws from the Ultra mounting hardware kit". For the most
part each hardware pack was consumed before needing to open the next one.
As
one would expect all pieces of hardware are listed in their excellent instructions
but the unexpected surprise is that they individually package the hardware by assembly
step. So while you're reading the instructions you see statements like; "use
the 6 10-32 screws from the Ultra mounting hardware kit". For the most
part each hardware pack was consumed before needing to open the next one.
Installation:
While there are more parts than a traditional fence, the installation
is fairly easy.
|
It's a good idea to skim through the instructions before starting, Yea, I know it's not in our nature but it will make things go easier. :) |
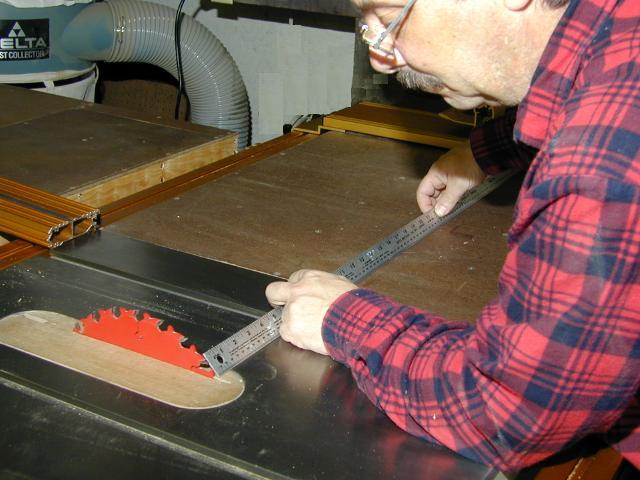
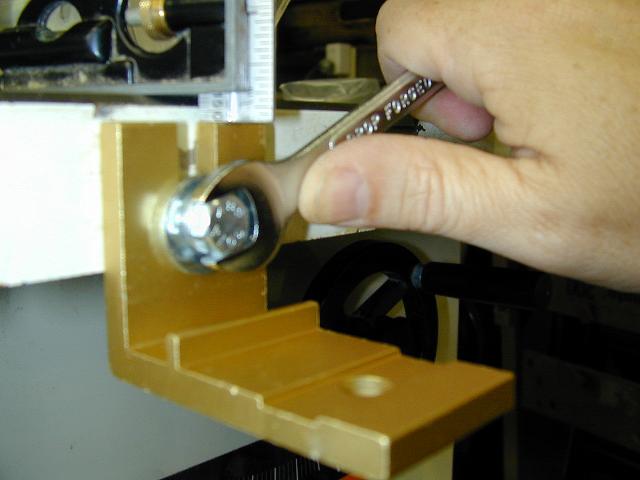 The first step is to locate the
rail mounting brackets (six are included) and the mounting bracket hardware kit.
For my installation only 4 brackets are needed. Using the included hardware, mount
the brackets on the front and rear table edge. The instructions call for the brackets
to be 1/4" below the top of the table and in the photo (left) you can see that
I'm using a rule to measure the distance. This precision is not necessary because
in the next step, we will make the final adjustments for your saw so eyeballing
it is fine (see tip above about reading ahead). At this time you also loosely fit
the rail mounting hardware to each bracket. The hardware pack contains a variety
of nuts, bolts and washers so you should be able to find the correct hardware for
your particular saw.
The first step is to locate the
rail mounting brackets (six are included) and the mounting bracket hardware kit.
For my installation only 4 brackets are needed. Using the included hardware, mount
the brackets on the front and rear table edge. The instructions call for the brackets
to be 1/4" below the top of the table and in the photo (left) you can see that
I'm using a rule to measure the distance. This precision is not necessary because
in the next step, we will make the final adjustments for your saw so eyeballing
it is fine (see tip above about reading ahead). At this time you also loosely fit
the rail mounting hardware to each bracket. The hardware pack contains a variety
of nuts, bolts and washers so you should be able to find the correct hardware for
your particular saw.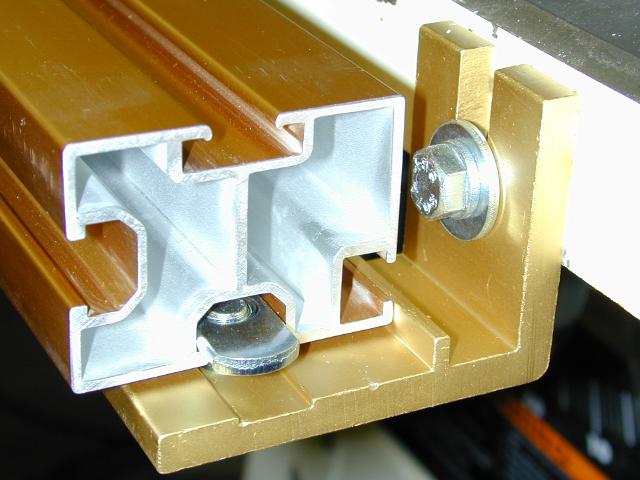 With the brackets installed it's time to mount the
rails. Slide the front and rear rail onto the brackets making sure that the side
with the T-slot on the bottom faces into the saw. With both rails mounted, temporarily
center them on the saw and tighten the hardware.
With the brackets installed it's time to mount the
rails. Slide the front and rear rail onto the brackets making sure that the side
with the T-slot on the bottom faces into the saw. With both rails mounted, temporarily
center them on the saw and tighten the hardware.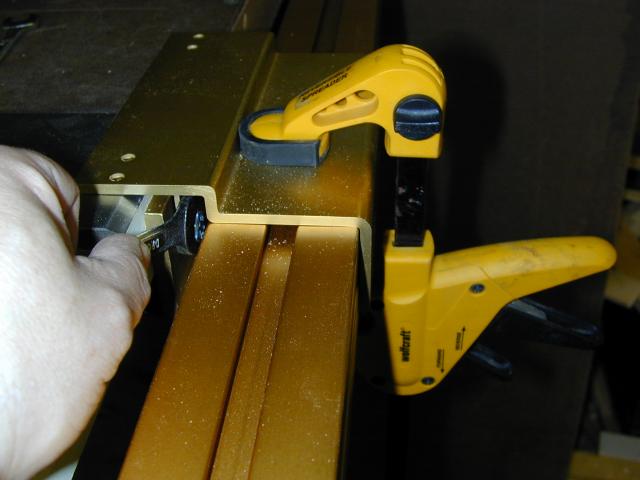 To set the final mounting bracket height, Incra
cleverly uses the base clamp as a gauge. You simply clamp the 4 base clamps to the
rail at each bracket location and adjust each mounting bracket (as shown at left)
until the base clamps are flush with the table top. This method of alignment worked
flawlessly and doesn't require you to measure anything which if you're like me is
a plus and greatly reduces the chances for error. Once you have tightened up the
brackets, you can loosen the rail mounting bolts and move the rails into their final
position. Simply move the rails so that they extend 7" out from the edge of
the left extension wing and re-tighten the rail mounting bolts.
To set the final mounting bracket height, Incra
cleverly uses the base clamp as a gauge. You simply clamp the 4 base clamps to the
rail at each bracket location and adjust each mounting bracket (as shown at left)
until the base clamps are flush with the table top. This method of alignment worked
flawlessly and doesn't require you to measure anything which if you're like me is
a plus and greatly reduces the chances for error. Once you have tightened up the
brackets, you can loosen the rail mounting bolts and move the rails into their final
position. Simply move the rails so that they extend 7" out from the edge of
the left extension wing and re-tighten the rail mounting bolts.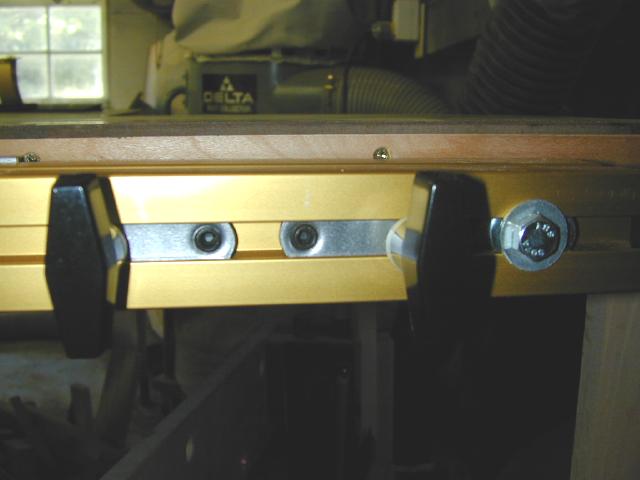 In
preparation for assembling the base mount assembly and the Ultra Jig, locate the
Rail Hardware pack, assemble per instructions, and slide the hardware onto the rails.
In
preparation for assembling the base mount assembly and the Ultra Jig, locate the
Rail Hardware pack, assemble per instructions, and slide the hardware onto the rails.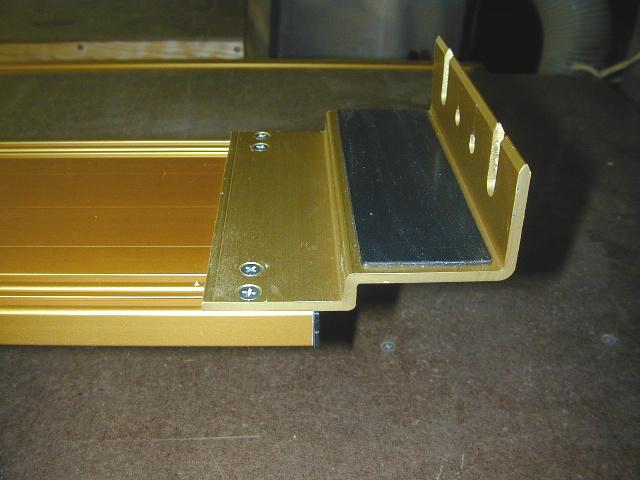


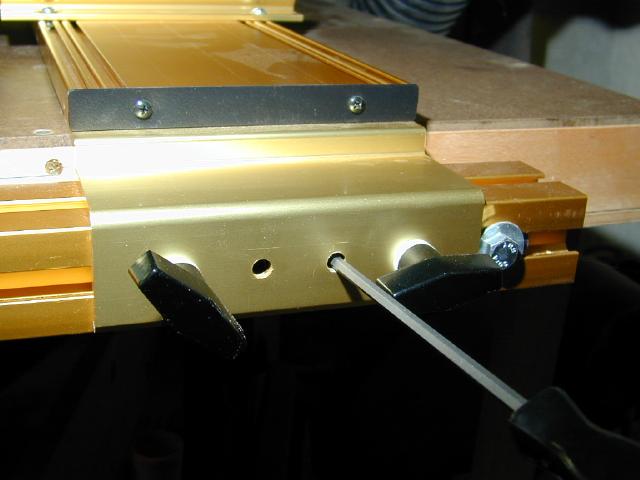
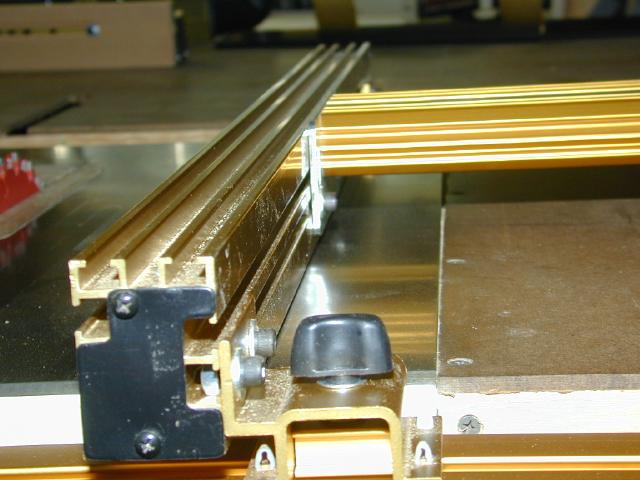
 At
this point you will want to tighten down all your knobs as well as the set screws
(left). Also move your stop washer (right) snug up against the right side of the
base clamp. This will allow you to exactly reposition your base assembly if you
have to move it for some other operation.
At
this point you will want to tighten down all your knobs as well as the set screws
(left). Also move your stop washer (right) snug up against the right side of the
base clamp. This will allow you to exactly reposition your base assembly if you
have to move it for some other operation.
Ok, we're coming down the home stretch now!

(left) Grab the carriage and insert it into the base and align the fence end up
with the right side rail brackets. Then loosely attach the fence (right) to the
carriage.
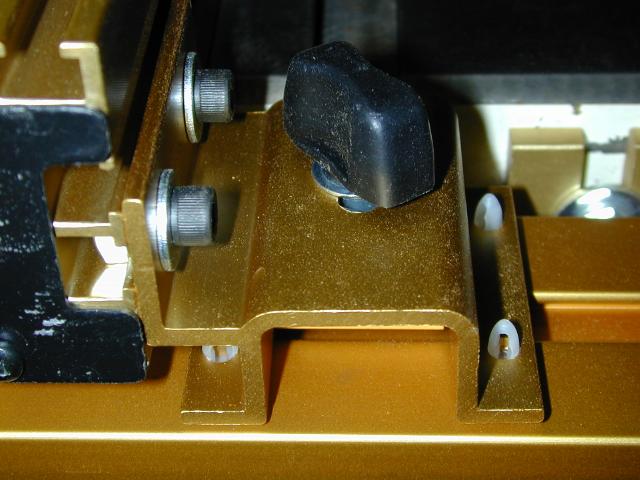

With the fence resting on the supplied cardboard spacers, attach the front and rear
glides. The front glide has a knob on it. These glides include an anti lift hook
which we will discuss later on.
Final Calibration:
While following the Incra instructions you will see an "Important"
note which briefly discusses saw blade/miter slot alignment and the reader is instructed
to consult his saw's owners manual for the details of the alignment. Being safety
conscious myself I felt a bit uneasy about the TS-III alignment procedure because
it makes a few assumptions. The first assumption is that all saws come with an alignment
procedure for blade to miter alignments. Because I know that my Jet Contractors
saw did not include the instructions, I performed some limited research and found
that some Jet and Powermatic saws do not include this procedure in their manual.
That same research indicated that almost all responders who had performed a blade/miter
alignment had aligned the blade to the LEFT slot. This leads to the second
assumption by Incra which is that the miter slots are parallel or that everyone
aligns to the RIGHT slot. In a perfect world the reader would have performed the
blade/miter slot alignment, the miter slots would be parallel, and exactly following
the Incra instructions would result in a perfect setup and that will probably be
the case most of the time.
Having said that it is my belief that the rip fence should always be aligned to
the blade and even though I followed Incra's instructions, I finished up with a
check and a tweak between the blade and the fence.
 Move
the fence until it lines up with the right miter slot and engage the micro-adjuster
by pushing the lever down(left). Use the micro-adjuster and a straight edge to align
the fence to the slot. Check both the front and rear of the fence. When you think
you have it, lock the carriage and make sure the fence is still aligned. You may
have to do this a couple of times to get things perfect.
Move
the fence until it lines up with the right miter slot and engage the micro-adjuster
by pushing the lever down(left). Use the micro-adjuster and a straight edge to align
the fence to the slot. Check both the front and rear of the fence. When you think
you have it, lock the carriage and make sure the fence is still aligned. You may
have to do this a couple of times to get things perfect.
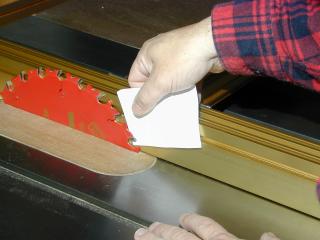 Once
you've set the fence to the slot, double check your alignment by checking a tooth
at the front of the saw, then rotate the blade and use that same tooth to check
the rear of the saw. Here I'm using a piece of paper as a gauge to check the fit
since my son walked off with my feeler gauges.
Once
you've set the fence to the slot, double check your alignment by checking a tooth
at the front of the saw, then rotate the blade and use that same tooth to check
the rear of the saw. Here I'm using a piece of paper as a gauge to check the fit
since my son walked off with my feeler gauges.
 Once
you are comfortable with the alignment, if needed, unlock the fence and use the
micro-adjuster to set the fence to just "kiss" the blade and lock the
fence. We can now Zero the TS-III.
Once
you are comfortable with the alignment, if needed, unlock the fence and use the
micro-adjuster to set the fence to just "kiss" the blade and lock the
fence. We can now Zero the TS-III.
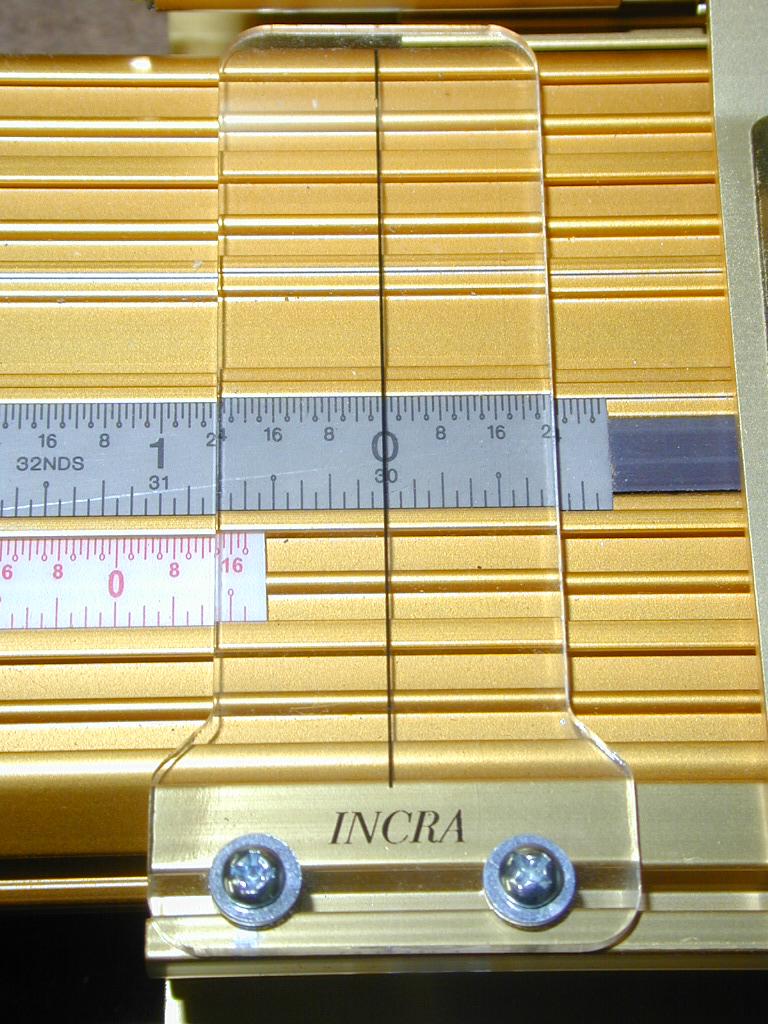
Simply move the magnetic steel rule until it reads zero under the pointer. We're
almost finished.
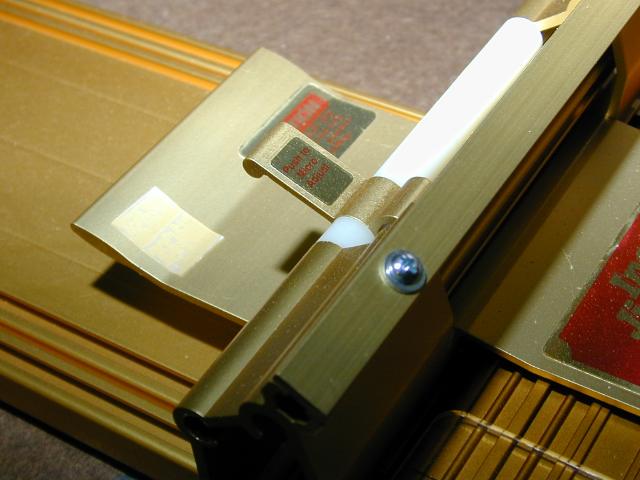
 The
last step in the Zeroing process it to align the micro-adjuster cursor to zero by
loosening the screws and sliding the plastic cursor until the zero mark lines up
with the knob. Next rotate the white micro-adjuster scale until it reads zero under
the cursor. In the photo at right the scale needs to be rotated until the "0"
aligns under the cursor.
The
last step in the Zeroing process it to align the micro-adjuster cursor to zero by
loosening the screws and sliding the plastic cursor until the zero mark lines up
with the knob. Next rotate the white micro-adjuster scale until it reads zero under
the cursor. In the photo at right the scale needs to be rotated until the "0"
aligns under the cursor.
Done!
The whole process including taking some pictures for this review, adapting my existing
extension tables, and running out to the hardware store for the missing screws took
an afternoon. The assembly was straight forward and at no time were the instructions
inadequate or difficult to use.
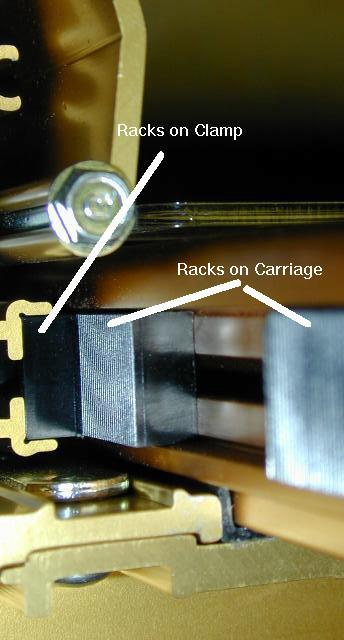 Why would a woodworker be attracted to the Incra TS-III? It has
to be its accuracy and precision. Incra utilizes patented saw tooth racks
which are manufactured in precise 1/32" increments. What does this mean
to us? It means that if your project's dimensions are measured in 1/32"
increments or larger then the TS-III will allow you to easily set the position
of the fence and easily return to that position with .001" accuracy.
If you need to be more precise than 1/32" you can use the Micro Adjuster
which has a scale with .001" increments.
Why would a woodworker be attracted to the Incra TS-III? It has
to be its accuracy and precision. Incra utilizes patented saw tooth racks
which are manufactured in precise 1/32" increments. What does this mean
to us? It means that if your project's dimensions are measured in 1/32"
increments or larger then the TS-III will allow you to easily set the position
of the fence and easily return to that position with .001" accuracy.
If you need to be more precise than 1/32" you can use the Micro Adjuster
which has a scale with .001" increments.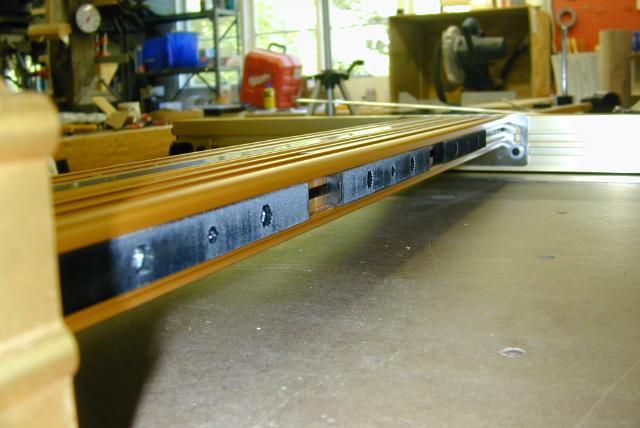 The
racks are attached down the far side of the carriage and secured by screws.
They are made from plastic and carry a lifetime warranty from Incra. In the
included instruction sheets, which are excellent if I haven't already mentioned
it, are directions for alignment of the racks in case you ever have to replace
one. According to Incra this is a very rare occurrence.
The
racks are attached down the far side of the carriage and secured by screws.
They are made from plastic and carry a lifetime warranty from Incra. In the
included instruction sheets, which are excellent if I haven't already mentioned
it, are directions for alignment of the racks in case you ever have to replace
one. According to Incra this is a very rare occurrence. This feature allows you to accurately and repeatably move the fence
by rotating the adjuster. It has a scale which has graduations that represent
a .001" movement of the fence. This feature is not to be confused with
the micro adjusters on some other after market fences which are really designed
to eliminate the "bumping" of the fence to set its position. There
is no "bumping" of the TS-III. Chris Taylor of Incra set me straight
on its function. When I first used it I was trying to use it just like the
adjuster on my Vega fence and I couldn't figure out how Incra could make their
claims of repeatability when I was moving the adjuster (and therefore the
rack alignment) all over the place. The correct usage is that during normal
fence operation the woodworker will only use the micro-adjuster to "Zero"
the fence during calibration and usually not use it again unless you need
to get more precise than 1/32". In that case you have to return the adjuster
back to zero when you're finished.
This feature allows you to accurately and repeatably move the fence
by rotating the adjuster. It has a scale which has graduations that represent
a .001" movement of the fence. This feature is not to be confused with
the micro adjusters on some other after market fences which are really designed
to eliminate the "bumping" of the fence to set its position. There
is no "bumping" of the TS-III. Chris Taylor of Incra set me straight
on its function. When I first used it I was trying to use it just like the
adjuster on my Vega fence and I couldn't figure out how Incra could make their
claims of repeatability when I was moving the adjuster (and therefore the
rack alignment) all over the place. The correct usage is that during normal
fence operation the woodworker will only use the micro-adjuster to "Zero"
the fence during calibration and usually not use it again unless you need
to get more precise than 1/32". In that case you have to return the adjuster
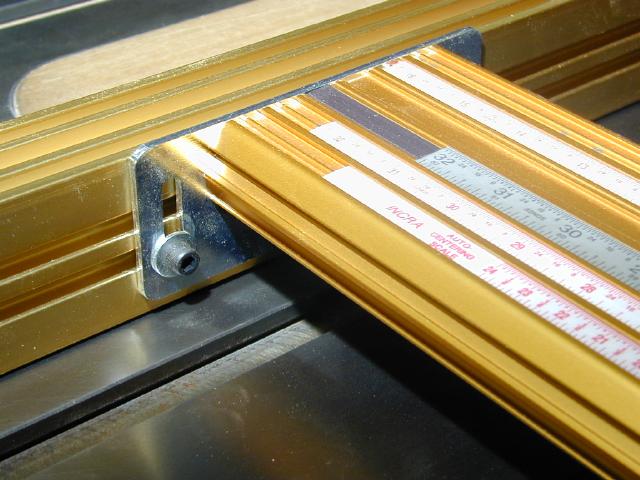
back to zero when you're finished.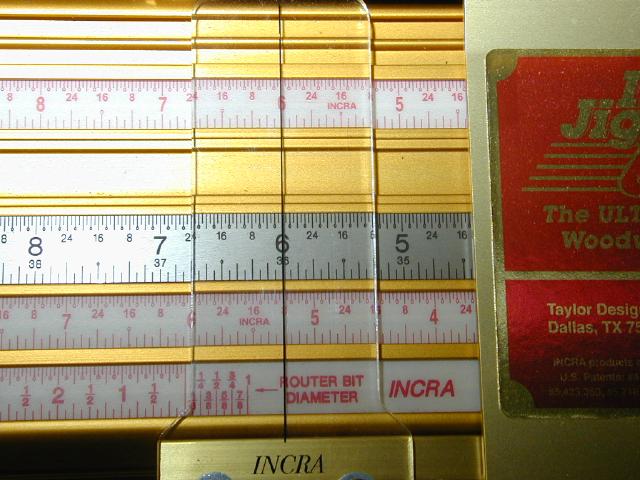 The included 32" stainless steel scale is your primary reference
for setting the position of the fence. It has to be accurate because the racks
are accurate and if it wasn't your measurements would appear to be off. The
TS-III's accuracy comes from the racks and not the scale. I performed an experiment
where I set the scale for "0" and them moved the fence so that I
could see how close it was at the 32" mark. I purposely aligned the cursor
a little off when I pulled the clamp to tighten it down. The racks pulled
the fence so that it locked dead on 32".
The included 32" stainless steel scale is your primary reference
for setting the position of the fence. It has to be accurate because the racks
are accurate and if it wasn't your measurements would appear to be off. The
TS-III's accuracy comes from the racks and not the scale. I performed an experiment
where I set the scale for "0" and them moved the fence so that I
could see how close it was at the 32" mark. I purposely aligned the cursor
a little off when I pulled the clamp to tighten it down. The racks pulled
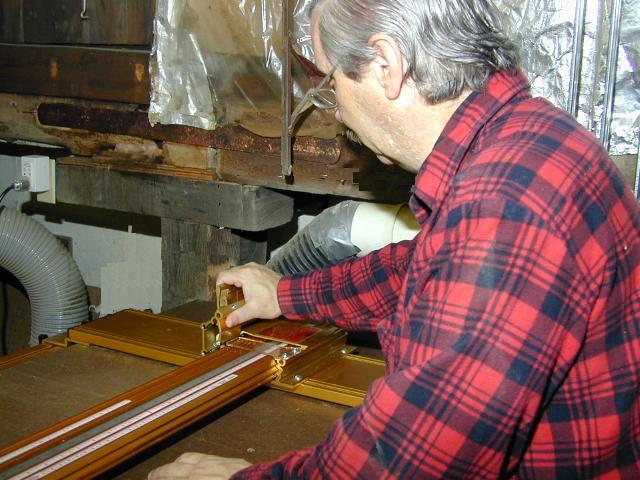
the fence so that it locked dead on 32".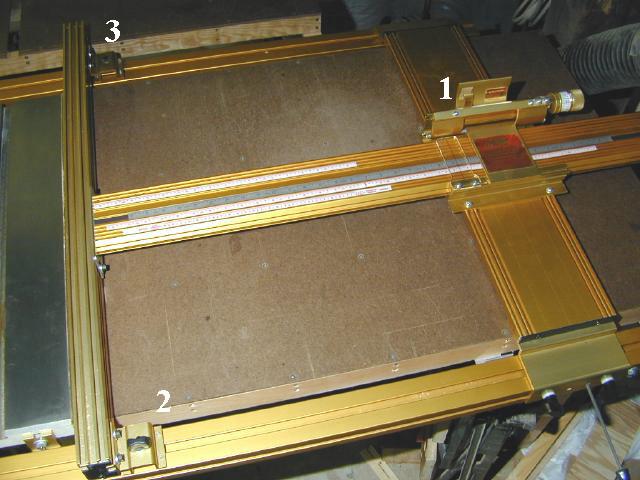 The Incra TS-III can be secured by up to three clamps. The first
clamp which is the one used all the time is right behind the cursor. Setting
this clamp locks and squares up the fence. For light duty ripping this is
all that is needed. The second clamp is located on the front end of the fence
and clamps the fence to the front rail. The third clamp is similar to the
front clamp albeit it requires the hex tool to engage. It provides not only
extra rigidity for those times when you are cutting large, heavy sheet goods
but also becomes and anti-lift clamp to enable you to safely utilize feather
boards and anti kickback rollers, etc.
The Incra TS-III can be secured by up to three clamps. The first
clamp which is the one used all the time is right behind the cursor. Setting
this clamp locks and squares up the fence. For light duty ripping this is
all that is needed. The second clamp is located on the front end of the fence
and clamps the fence to the front rail. The third clamp is similar to the
front clamp albeit it requires the hex tool to engage. It provides not only
extra rigidity for those times when you are cutting large, heavy sheet goods
but also becomes and anti-lift clamp to enable you to safely utilize feather
boards and anti kickback rollers, etc.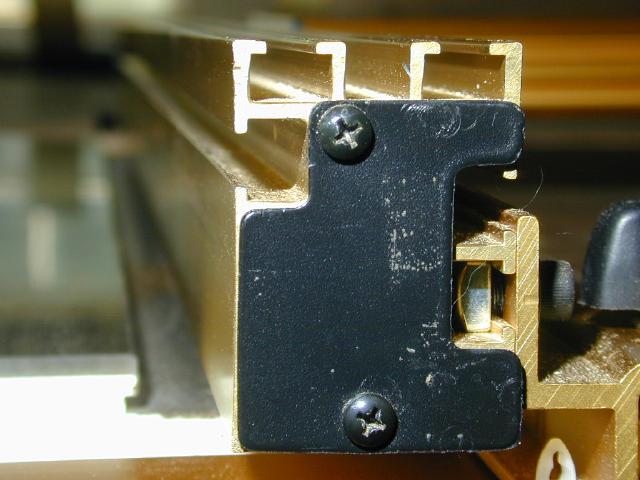
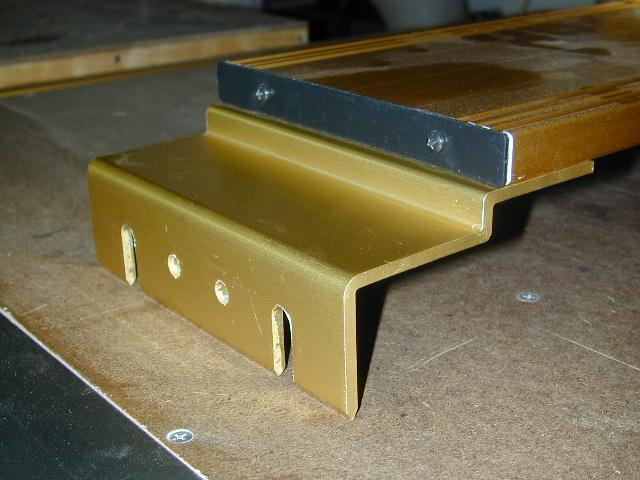
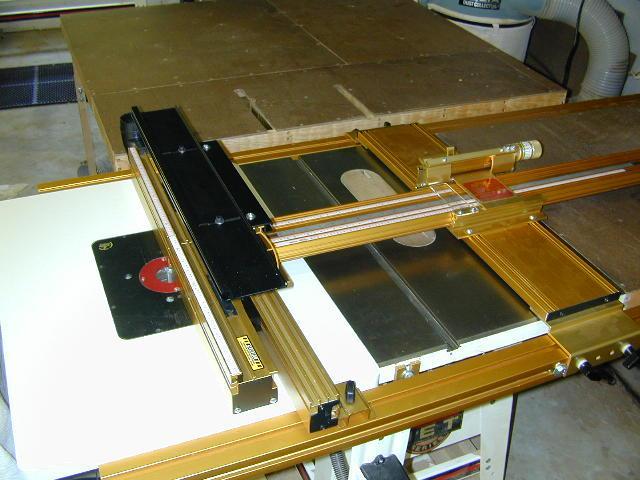
 Since this is a review about a table saw fence I thought I had better
show a few pictures of the actual fence. Its dimensions are roughly 36"
long by 1 3/4" wide by 2 3/8" tall. As you can see in the photos
there is a 1/4" T-slot along the face, two in the top, and two on the
back side. The fence face on the TS-III is just as it was extruded but the
new TS-IIIa has a machined flat face. I see nothing wrong with the extruded
face.
Since this is a review about a table saw fence I thought I had better
show a few pictures of the actual fence. Its dimensions are roughly 36"
long by 1 3/4" wide by 2 3/8" tall. As you can see in the photos
there is a 1/4" T-slot along the face, two in the top, and two on the
back side. The fence face on the TS-III is just as it was extruded but the
new TS-IIIa has a machined flat face. I see nothing wrong with the extruded
face.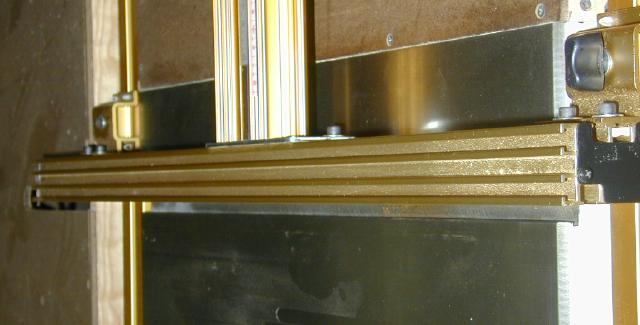
 Hold on to your wallet because once you've installed and used this
fence and visited Woodpecker's
web page you're gonna want to add some other goodies like extension wings,
router fences, joinery packages and more! At right you see the Woodpecker's
Router Table Extension Wing (RTEW) and the Incra Wonder Fence which will be
the subject of my next review.
Hold on to your wallet because once you've installed and used this
fence and visited Woodpecker's
web page you're gonna want to add some other goodies like extension wings,
router fences, joinery packages and more! At right you see the Woodpecker's
Router Table Extension Wing (RTEW) and the Incra Wonder Fence which will be
the subject of my next review.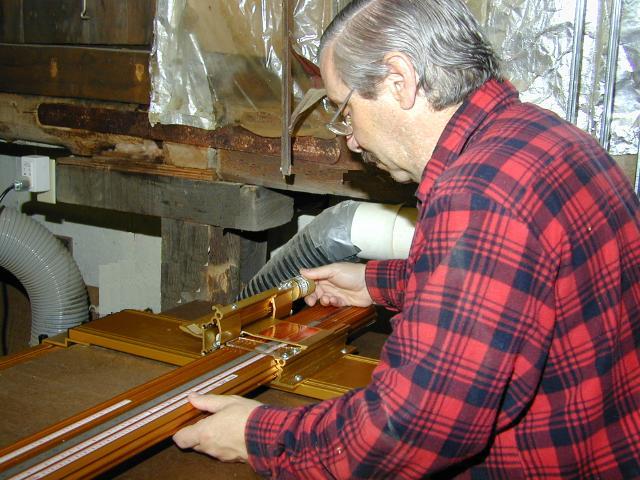
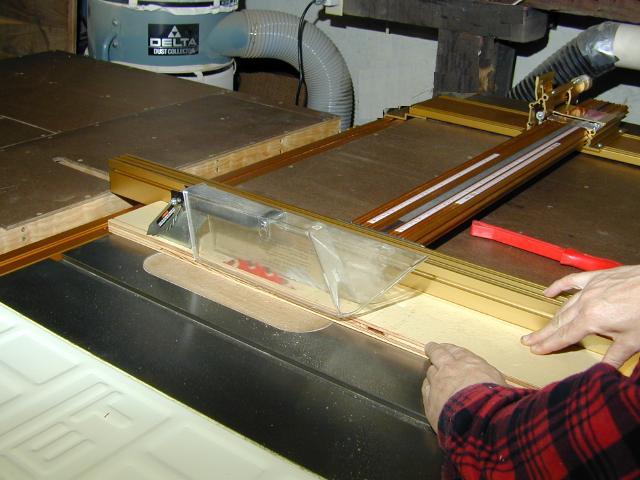
 In these two photographs you'll
see me working the Micro Adjuster and locking the fence using the primary
clamp. It is interesting to note that using the TS-III requires you to focus
your attention to the right end of the saw and look at the Ultra Jig assembly
when setting up for a cut. With traditional fences we seem to have the blade
and fence still within our focus while setting the distance of the fence.
It doesn't matter that we can't see that blade to fence relationship while
looking at the scale, it's just different and requires a few minutes to get
used to.
In these two photographs you'll
see me working the Micro Adjuster and locking the fence using the primary
clamp. It is interesting to note that using the TS-III requires you to focus
your attention to the right end of the saw and look at the Ultra Jig assembly
when setting up for a cut. With traditional fences we seem to have the blade
and fence still within our focus while setting the distance of the fence.
It doesn't matter that we can't see that blade to fence relationship while
looking at the scale, it's just different and requires a few minutes to get
used to.
Miscellaneous stuff:
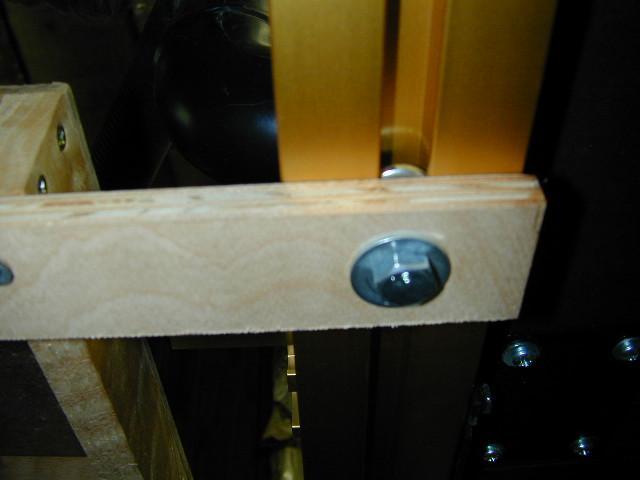
![]() I
mentioned earlier that I had to adapt my existing extension tables to mount
with the TS-III. The left side extension table was pretty simple. I utilized
the mounting brackets that Incra supplied but you can easily make your own.
Simply mount an "L" bracket to the T-track on the front and rear
rail and use them to support your table. The rear was a bit more difficult
because I had to move the table away from the rear of the saw to provide the
clearance required to allow for the base assembly to be positioned anywhere
along the length of the rails. To accomplish this I just cut a piece of 1/2"
birch plywood and used some leftover hardware to attach the new plywood bracket
to the rear rail (left). Then I simply moved the extension table out far enough
to provide the clearance needed (right). This brings to light an inconvenience
for the woodworker with an outfeed table. Repositioning the TS-III requires
access to the rear of the table saw. You may have to use an allen wrench instead
of the hex driver (I did) to secure or loosen the set screws. If you don't
have an outfeed table yet but plan on making one, you should consider making
it free standing so that you can drag it out of the way when repositioning
the TS-III.
I
mentioned earlier that I had to adapt my existing extension tables to mount
with the TS-III. The left side extension table was pretty simple. I utilized
the mounting brackets that Incra supplied but you can easily make your own.
Simply mount an "L" bracket to the T-track on the front and rear
rail and use them to support your table. The rear was a bit more difficult
because I had to move the table away from the rear of the saw to provide the
clearance required to allow for the base assembly to be positioned anywhere
along the length of the rails. To accomplish this I just cut a piece of 1/2"
birch plywood and used some leftover hardware to attach the new plywood bracket
to the rear rail (left). Then I simply moved the extension table out far enough
to provide the clearance needed (right). This brings to light an inconvenience
for the woodworker with an outfeed table. Repositioning the TS-III requires
access to the rear of the table saw. You may have to use an allen wrench instead
of the hex driver (I did) to secure or loosen the set screws. If you don't
have an outfeed table yet but plan on making one, you should consider making
it free standing so that you can drag it out of the way when repositioning
the TS-III.
Testing:
 I don't have much to show you in the way of pictures for this part
of the review except for the one at left of me ripping a piece of plywood.
What I wanted to determine at this point was how well the fence was going
to remain in alignment after some use, repositioning and removing and replacing.
I don't have much to show you in the way of pictures for this part
of the review except for the one at left of me ripping a piece of plywood.
What I wanted to determine at this point was how well the fence was going
to remain in alignment after some use, repositioning and removing and replacing.
The first thing I did was remove and replace the fence and carriage from the
jig a couple of times. Each time I locked it down on zero and checked it's
alignment and position to the blade. Everything remained in alignment.
The next test was to loosen the base clamp knobs and completely remove the
assembly including the fence and carriage in one piece and place it down on
a bench. I then slid the clamp hardware into position near the stops I had
previously installed so that I could use the fence on the left side router
wing. After placing the fence assembly back on the rails and getting all the
knobs tightened down moved the fence up next to the blade and checked the
alignment. It was perfect.
The last test in this series was to again remove the fence assembly and reposition
it back up against the stops where it was originally installed. This time
I was not only going to check alignment but I wanted to check and see if the
fence was still "zeroed" to the blade. Again alignment was perfect
as well as the zero. During all of this I was paying attention to how the
carriage was sliding along the rails and I felt no noticeable difference,
another indication that everything was remaining in alignment.
The final test I performed was to use my 36" steel rule and measure the
fence alignment to the right miter slot at 15" and 31". Unlike traditional
fences the TS-III does not change it reference point for alignment as you
reposition it. All other fences rely on the rail position as their reference
so if it's bowed of warped it can affect the fence, especially at the far
end. As I expected the TS-III's alignment was perfect.
Ultimately the only way to tell how well the TS-III will hold up is with time
and use. It is my belief that as long as you always use the front infeed clamp
there should be no reason for the fence to get out of alignment. If you don't
use the clamp then you run the risk of whacking it with a piece of wood and
either bending something or causing it to move.
Conclusion:
The TS-III is easy to install and performs exactly as advertised.
You will quickly fall in love with the positive action of the racks and the
ease by which you will be able to set an accurate, repeatable fence position.
The fit and finish was outstanding as there was not a single surface scratch
on my unit. There are a couple of minor annoyances, the worst of which will
be the time you spend looking for the hex driver or acquiring missing hardware
(Chris Taylor of Incra assures me that missing hardware is a very rare occurrence).
As I stated right up front, the downside is the space it requires but if you
have the real estate, I don't think you will be disappointed.